> For the complete documentation index, see [llms.txt](https://www.boxhero.io/docs/llms.txt). Markdown versions of documentation pages are available by appending `.md` to page URLs; this page is available as [Markdown](https://www.boxhero.io/docs/key-features/purchase-and-sales.md).

# Purchases & Sales

<figure><img src="/files/josQCFPCj9EPN3c3kdYu" alt=""><figcaption></figcaption></figure>

***

## Key Highlights

* **Order Management:** Create and manage purchase orders and sales orders.
* **Status Tracking:** Monitor order progress with clear status labels.
* **Invoicing**: Send invoices to partners via email or export to PDF for printing.
* **Bundled Items:** Simplify grouped items by creating bundles.
* **Custom Pricing**: Set custom prices for specific orders, and apply taxes/discounts.
* **Returns Management:** Manage returns and refunds for specific orders.
* **Sales Reports**: Analyze your sales data with detailed reports.

{% hint style="warning" %} <mark style="color:$primary;">`Purchases & Sales`</mark> are different from <mark style="color:$primary;">`Inventory Transactions`</mark> (Stock In, Out, Adjust, Move). Both features help manage inventory quantities, but they serve different purposes.

* Use **Purchases & Sales** when you need purchase or sales records, pricing, or invoices.
* Use **Transactions** for quick internal updates that don’t require any documents.
  {% endhint %}

***

## Purchases

Go to <mark style="color:$primary;">`Purchases & Sales`</mark> > <mark style="color:$primary;">`Purchases`</mark> to create and manage purchase orders.

{% embed url="<https://customer-0jrbilsa8yt3k758.cloudflarestream.com/a4f50b31fd0a4695abdbd0194037ca52/iframe?autoplay=true&controls=false&letterboxColor=transparent&loop=true&muted=true&poster=https://customer-0jrbilsa8yt3k758.cloudflarestream.com/a4f50b31fd0a4695abdbd0194037ca52/thumbnails/thumbnail.jpg?height=1080&preload=true>" %}

### Purchase Order Status

<table><thead><tr><th>PO Status</th><th width="235.94879150390625">Description</th><th>Updates inventory?</th><th>Included in Sales Reports?</th></tr></thead><tbody><tr><td><strong>Draft</strong></td><td>Saved, but not yet sent to the supplier</td><td>No</td><td>No</td></tr><tr><td><strong>Ordered</strong></td><td>Placed with the supplier; awaiting delivery</td><td>No</td><td>Yes</td></tr><tr><td><strong>Partially Received</strong></td><td>Some items received, others still pending</td><td>Yes</td><td>Yes</td></tr><tr><td><strong>Received</strong></td><td>All items received</td><td>Yes</td><td>Yes</td></tr></tbody></table>

#### Receiving Items with a Purchase Order

When your items arrive, open the purchase order to process the *Stock In*.&#x20;

* To receive the entire ordered quantity at once, click <mark style="color:$primary;">`Mark as Received`</mark>.&#x20;
* To receive items in batches as they arrive, click <mark style="color:$primary;">`Partially Receive`</mark>.

<figure><img src="/files/gKWUnK731VHCJYt2ee3h" alt=""><figcaption></figcaption></figure>

Clicking <mark style="color:$primary;">`Partially Receive`</mark>  opens a screen where you can record the quantity received for each item. If you ordered 5 units but only 1 arrived, enter 1 — the order status will show as **Partially Received** until the remaining items are stocked in.

<figure><img src="/files/UtVRdiWlJGjH9q7oR4vw" alt=""><figcaption></figcaption></figure>

{% hint style="success" %}
**Pro Tip:** <mark style="color:$primary;">`Partial Receive`</mark> also works well for inspection. As you verify that the delivered items match your order, you can stock in exactly the quantities that arrived.
{% endhint %}

If the items have already arrived when you're creating the purchase order, check **"Stock in items immediately after saving this order"** at the bottom of the order screen. The order will be saved with the **Received** status, and your inventory will be updated right away.

<figure><img src="/files/NPl5o8ZTreahkSnUcX5j" alt=""><figcaption></figcaption></figure>

{% hint style="warning" %}
Inventory is updated only after the *Stock In* process is completed.

* **Draft** or **Ordered** → No inventory change
* **Partially Received** or **Received** → Inventory updated
  {% endhint %}

***

## **Sales**

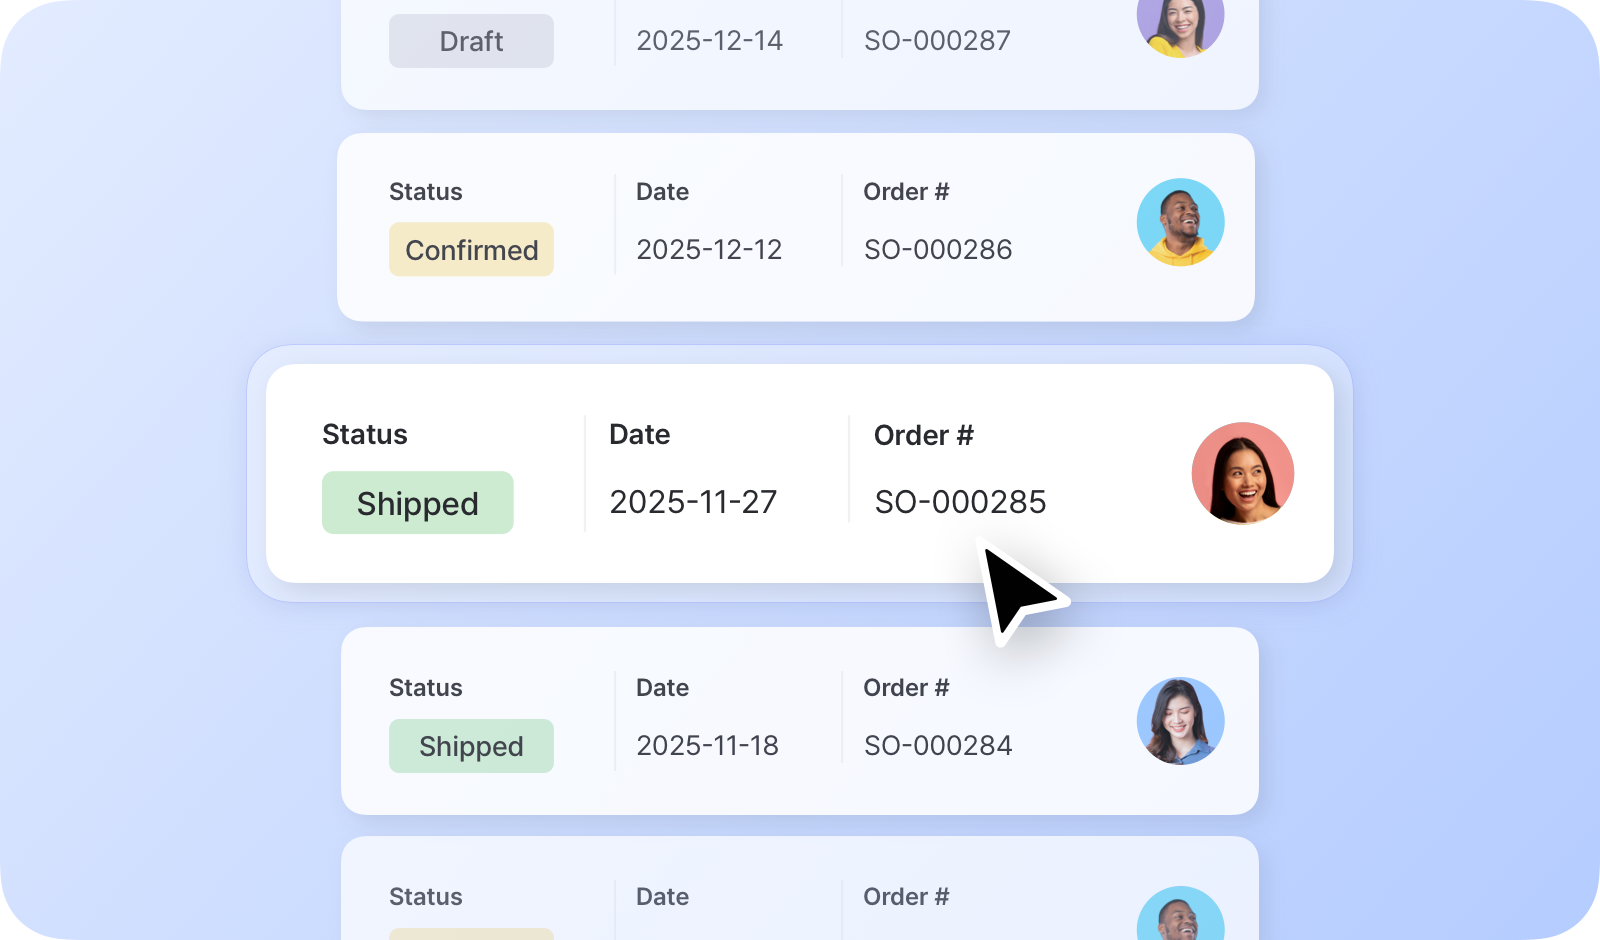
Go to <mark style="color:$primary;">`Purchases & Sales`</mark> > <mark style="color:$primary;">`Sales`</mark> to create and manage sales orders.

<figure><img src="/files/B5xQAabXz80lINSZucuv" alt=""><figcaption></figcaption></figure>

### Sales Order Status

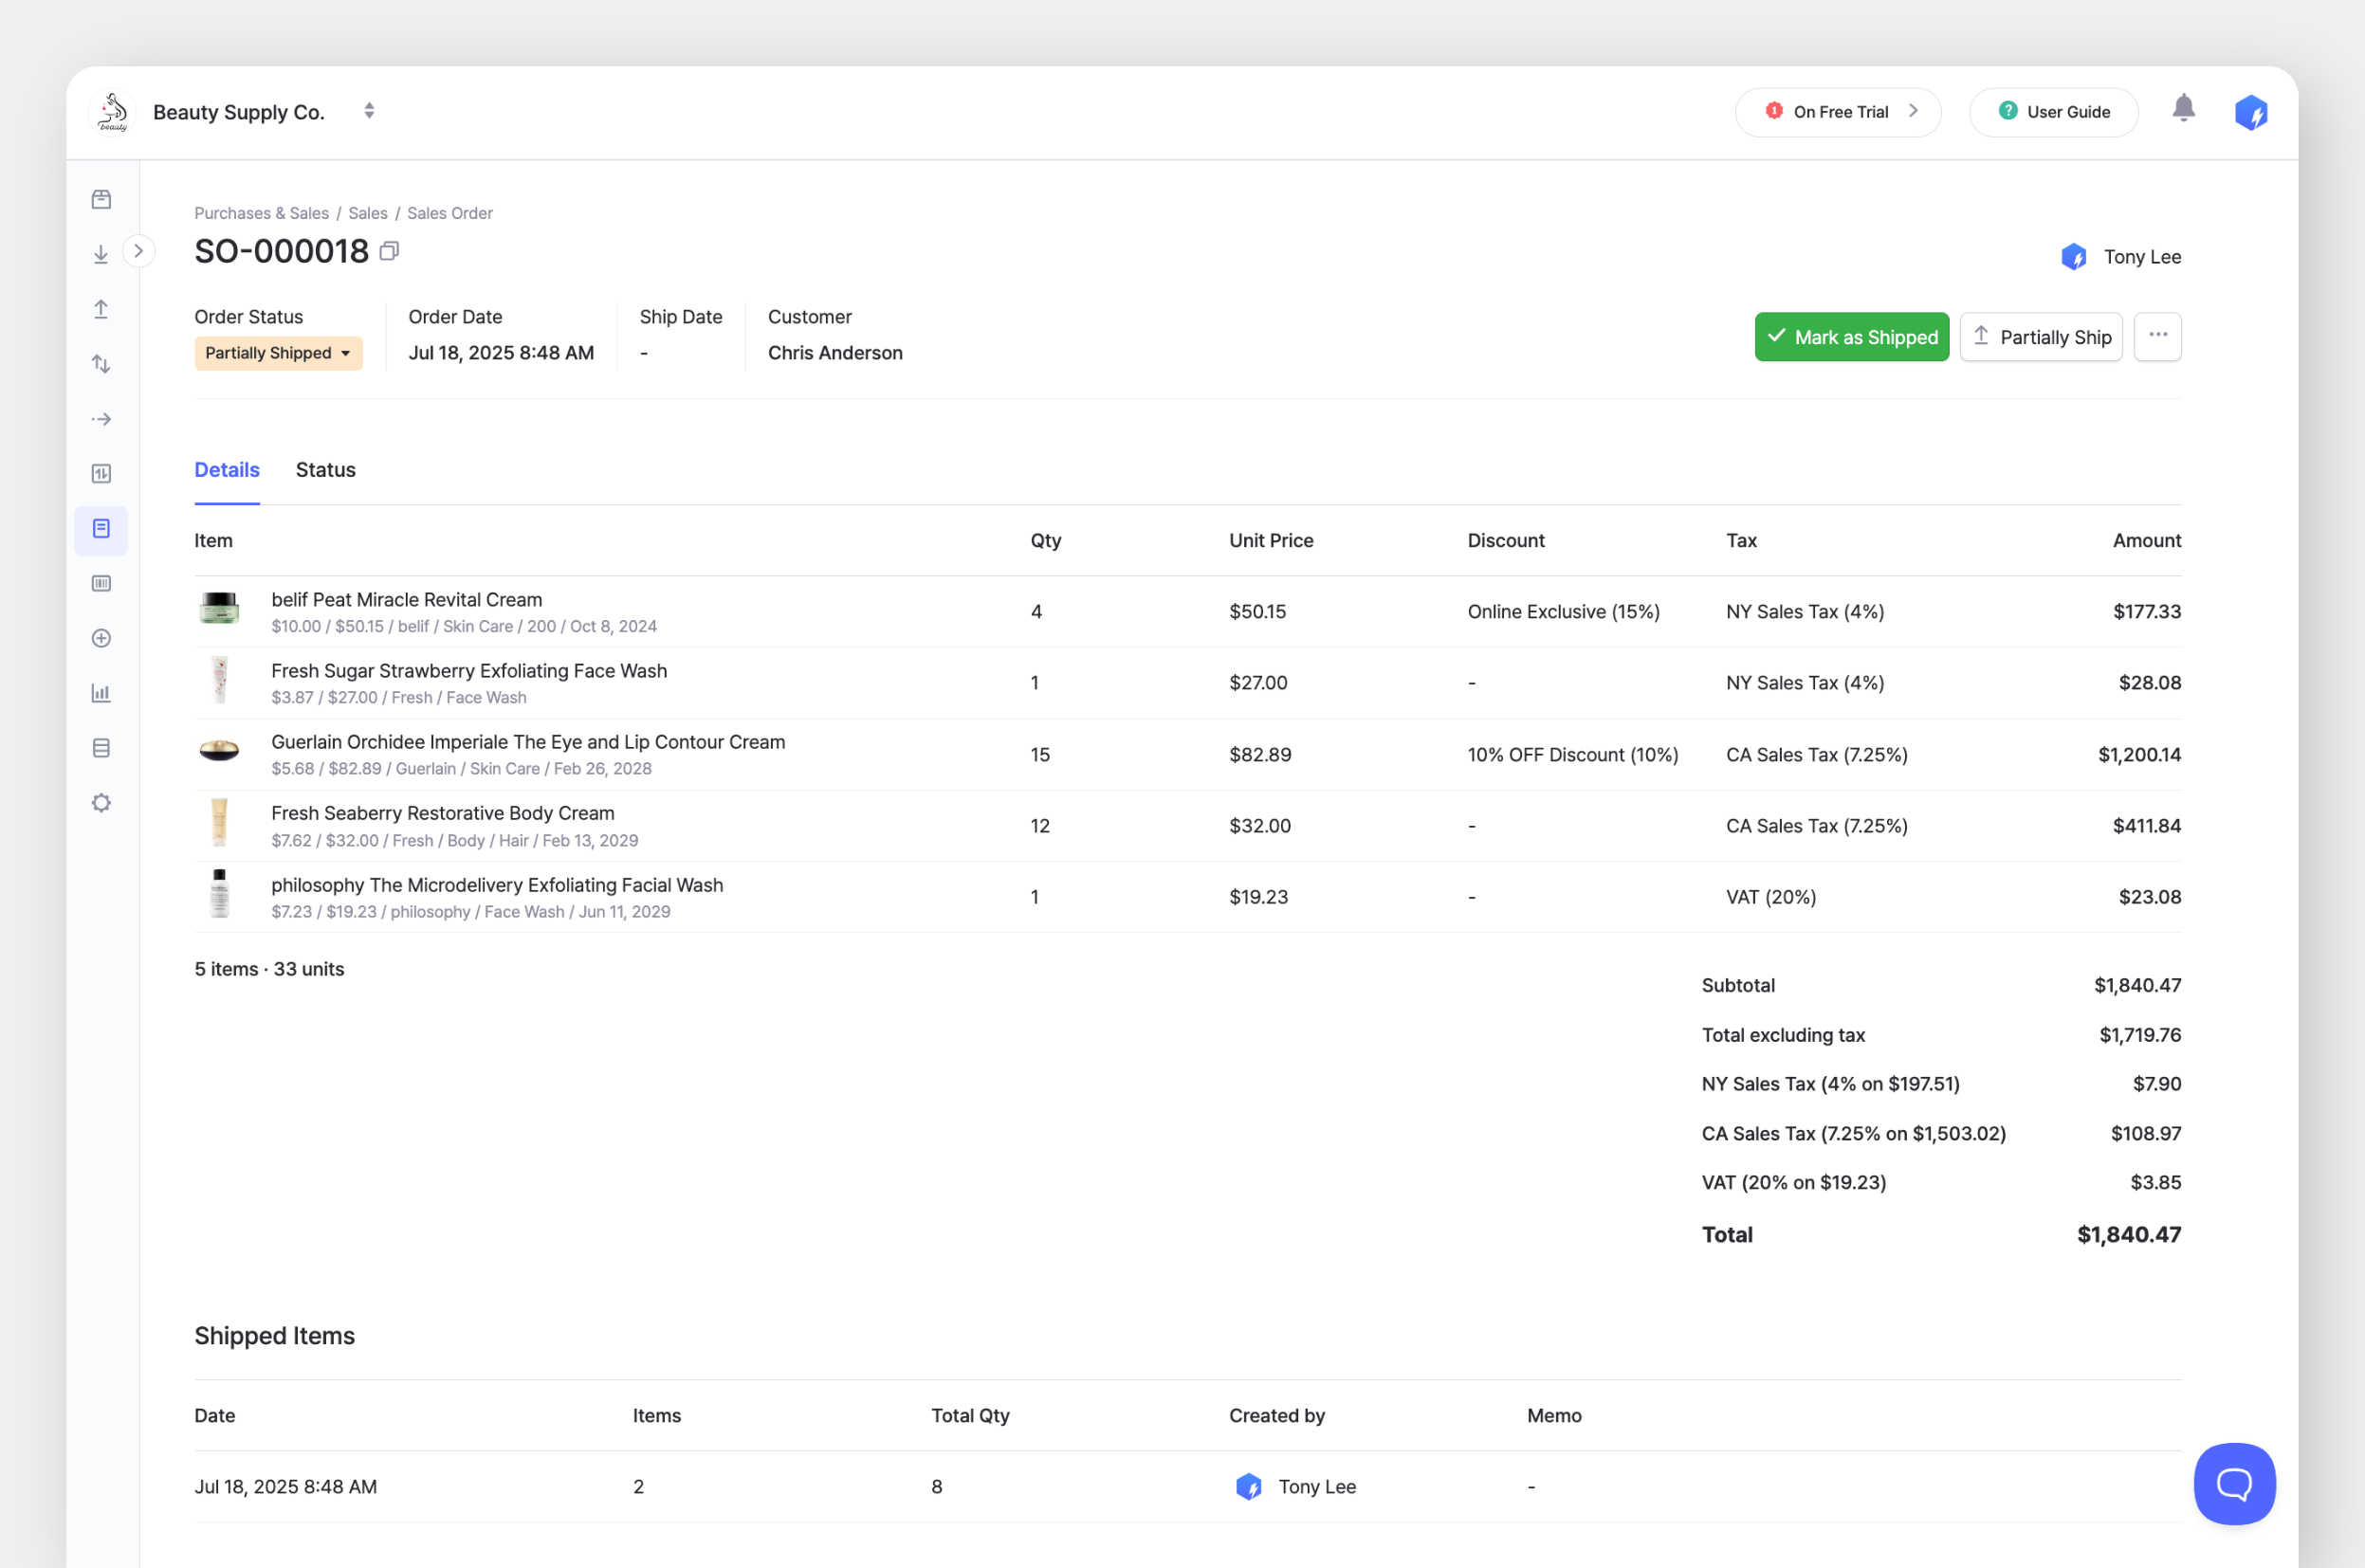
<table><thead><tr><th width="154.72479248046875">SO Status</th><th width="235.26214599609375">Description</th><th>Updates inventory?</th><th>Included in Sales Reports?</th></tr></thead><tbody><tr><td><strong>Draft</strong></td><td>Saved, but not yet confirmed</td><td>No</td><td>No</td></tr><tr><td><strong>Confirmed</strong></td><td>Confirmed; awaiting shipment</td><td>No</td><td>Yes</td></tr><tr><td><strong>Partially Shipped</strong></td><td>Some items shipped, others still pending</td><td>Yes</td><td>Yes</td></tr><tr><td><strong>Shipped</strong></td><td>All items shipped</td><td>Yes</td><td>Yes</td></tr></tbody></table>

#### Shipping Items with a Sales Order

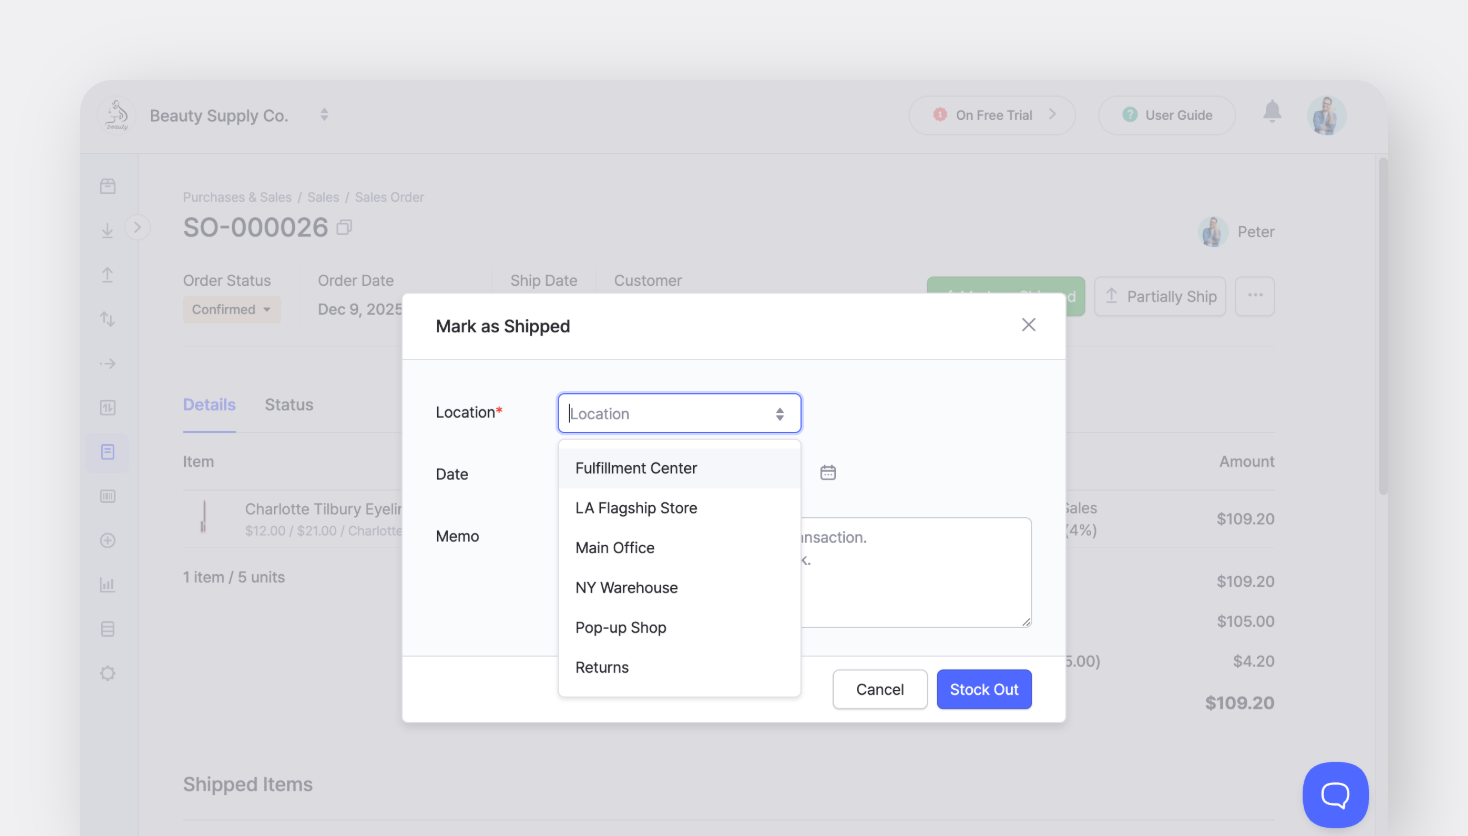
When you're ready to send out items, open the sales order to process the *Stock Out*. To ship the entire sold quantity at once, click <mark style="color:$primary;">`Mark as Shipped`</mark>. To ship items in batches, click <mark style="color:$primary;">`Partially Ship`</mark>.

<figure><img src="/files/XznallqKZT6lGKEX53pY" alt=""><figcaption></figcaption></figure>

Clicking <mark style="color:$primary;">`Partially Ship`</mark> allows you to enter the shipped quantity for each item — simply enter the quantity you're actually sending.The order status will show as **Partially Shipped** until all items are shipped out.

<figure><img src="/files/1sriStuj1tQ94Qd2rj02" alt=""><figcaption></figcaption></figure>

If the items have already been shipped when you're creating the sales order, check **"Stock out items immediately after saving this order"** at the bottom of the order screen. The order will be saved with the **Shipped** status, and your inventory will be updated right away.

<figure><img src="/files/SF4FgQJUeKTmCuzIfb0r" alt=""><figcaption></figcaption></figure>

{% hint style="success" %}
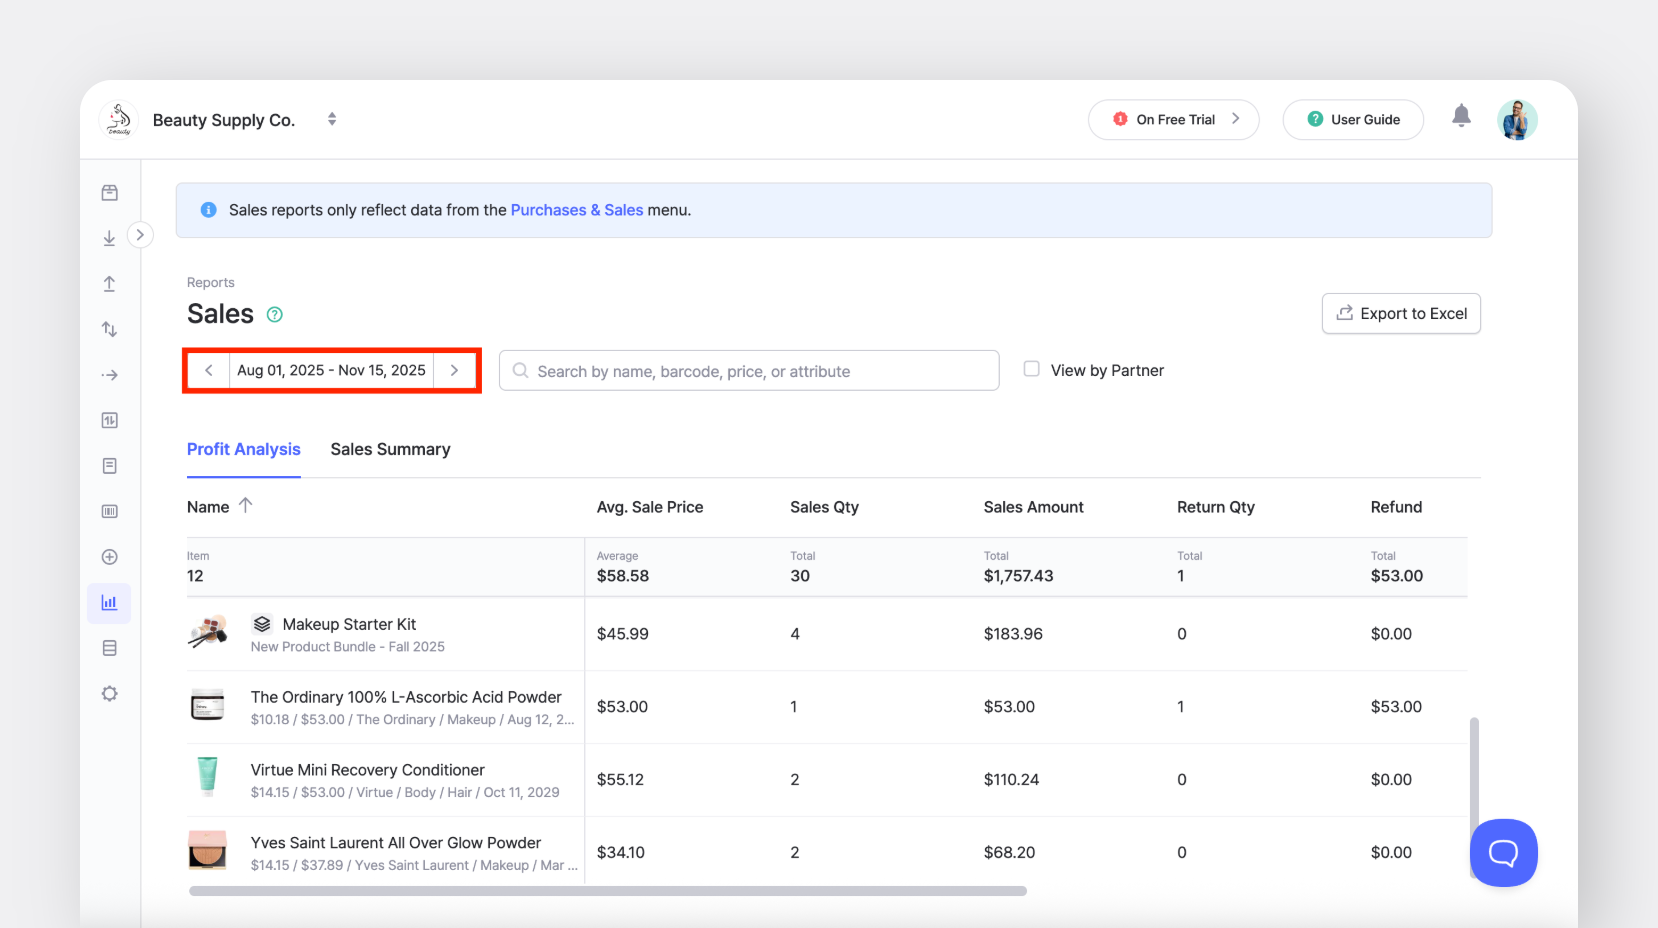
**Pro Tip:** Use BoxHero's [Sales Reports](/docs/key-features/purchase-and-sales/sales-reports.md) to:

* Track key metrics like sales price, quantity, and profit
* Analyze sales performance over a selected date range
* Identify trends and pricing opportunities
  {% endhint %}

***

## Returns

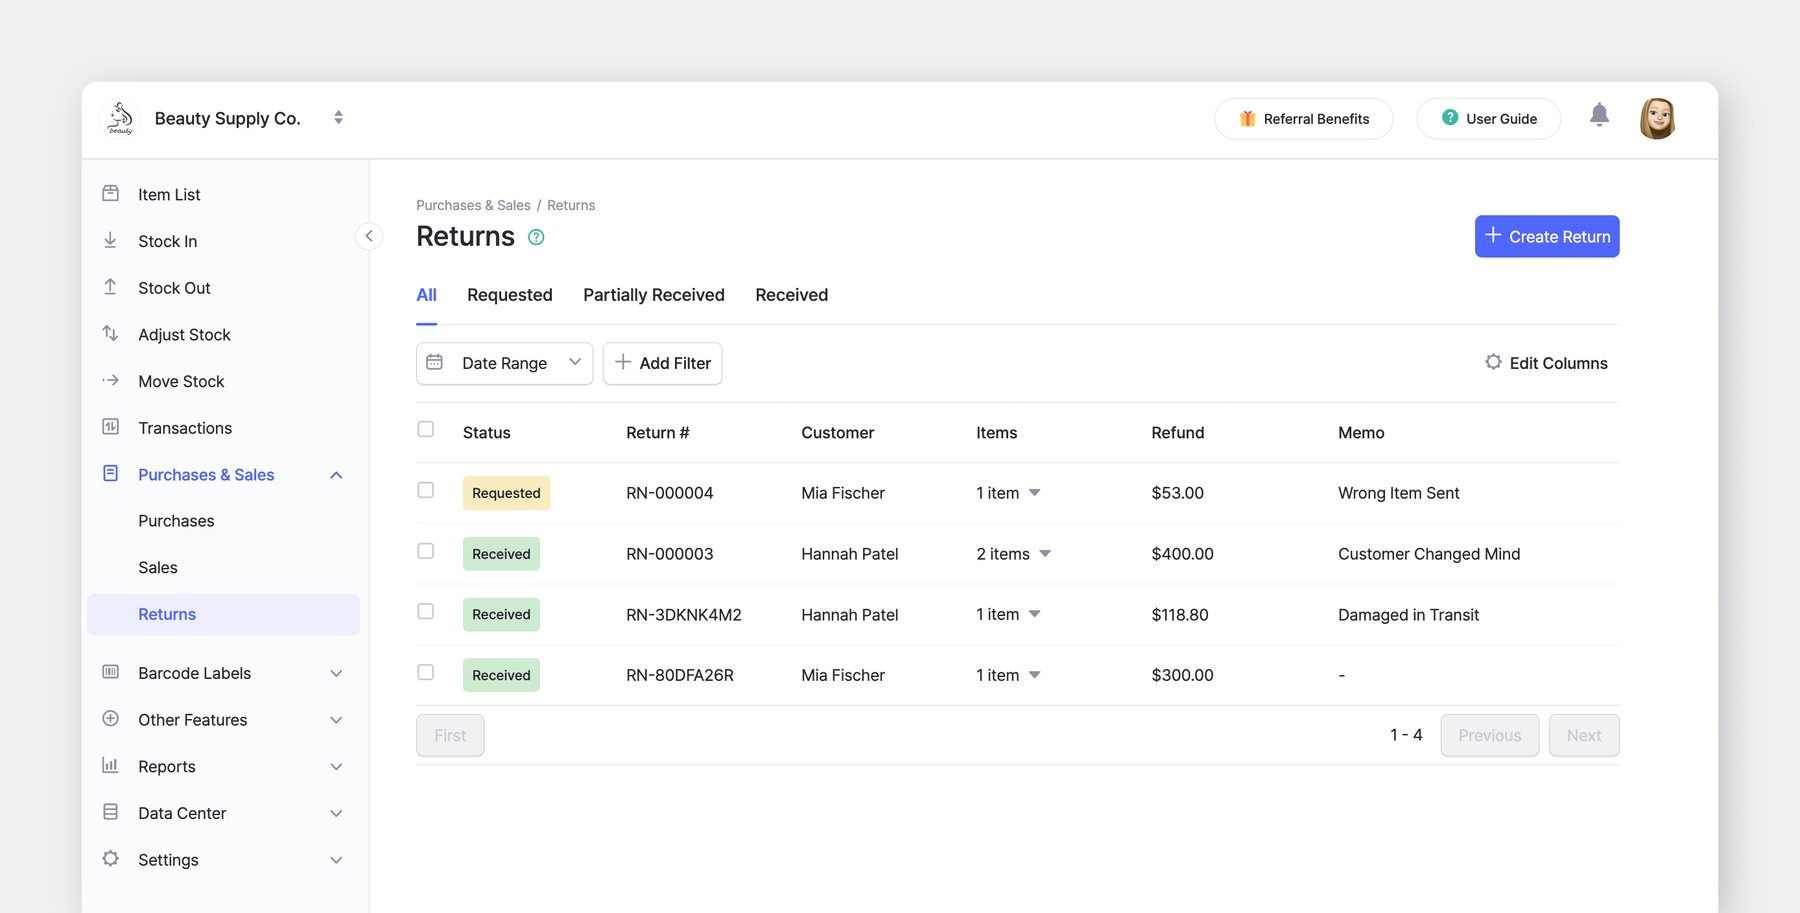
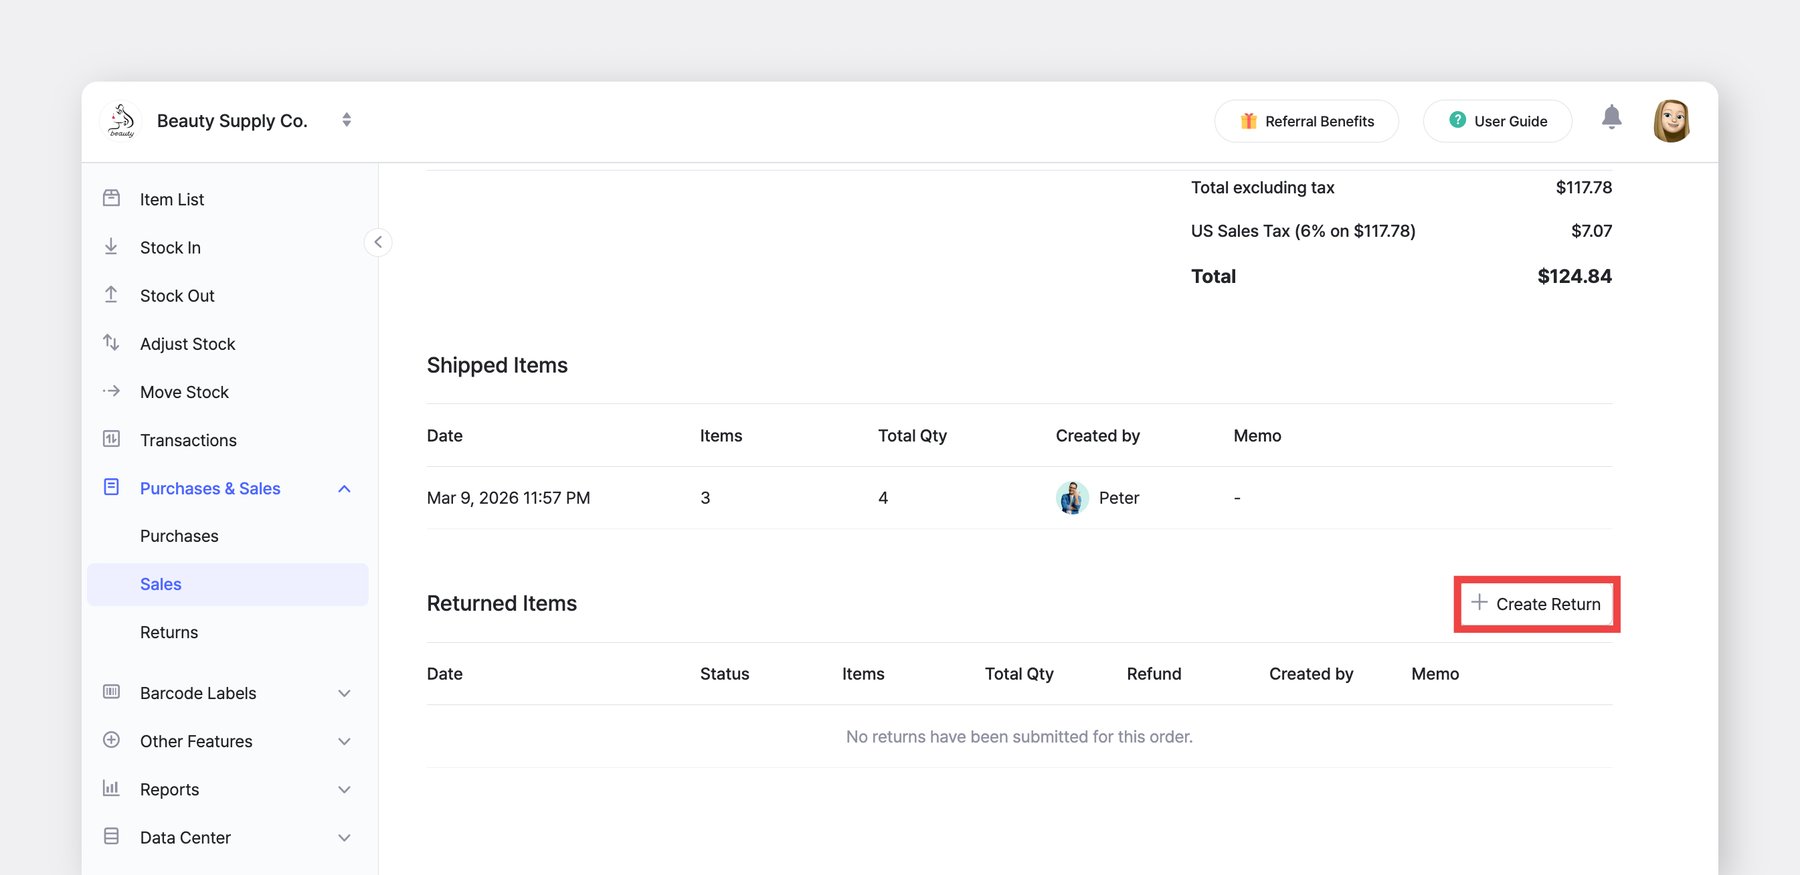
You can streamline customer returns by linking them directly to your original sales orders.

<figure><img src="/files/JRjWOmuOjXxYO6oNrOpi" alt=""><figcaption></figcaption></figure>

### Return Status

* **Requested**: The return request has been initiated, but the items have not yet arrived at the location.
* **Partially Received:** Some items from the original sales order have arrived, while others are still pending.
* **Received:** All items in the return have been physically received and added back into inventory.

#### Option 1: Create a Return by Order Number

Use this method if you have the customer's receipt or invoice handy.

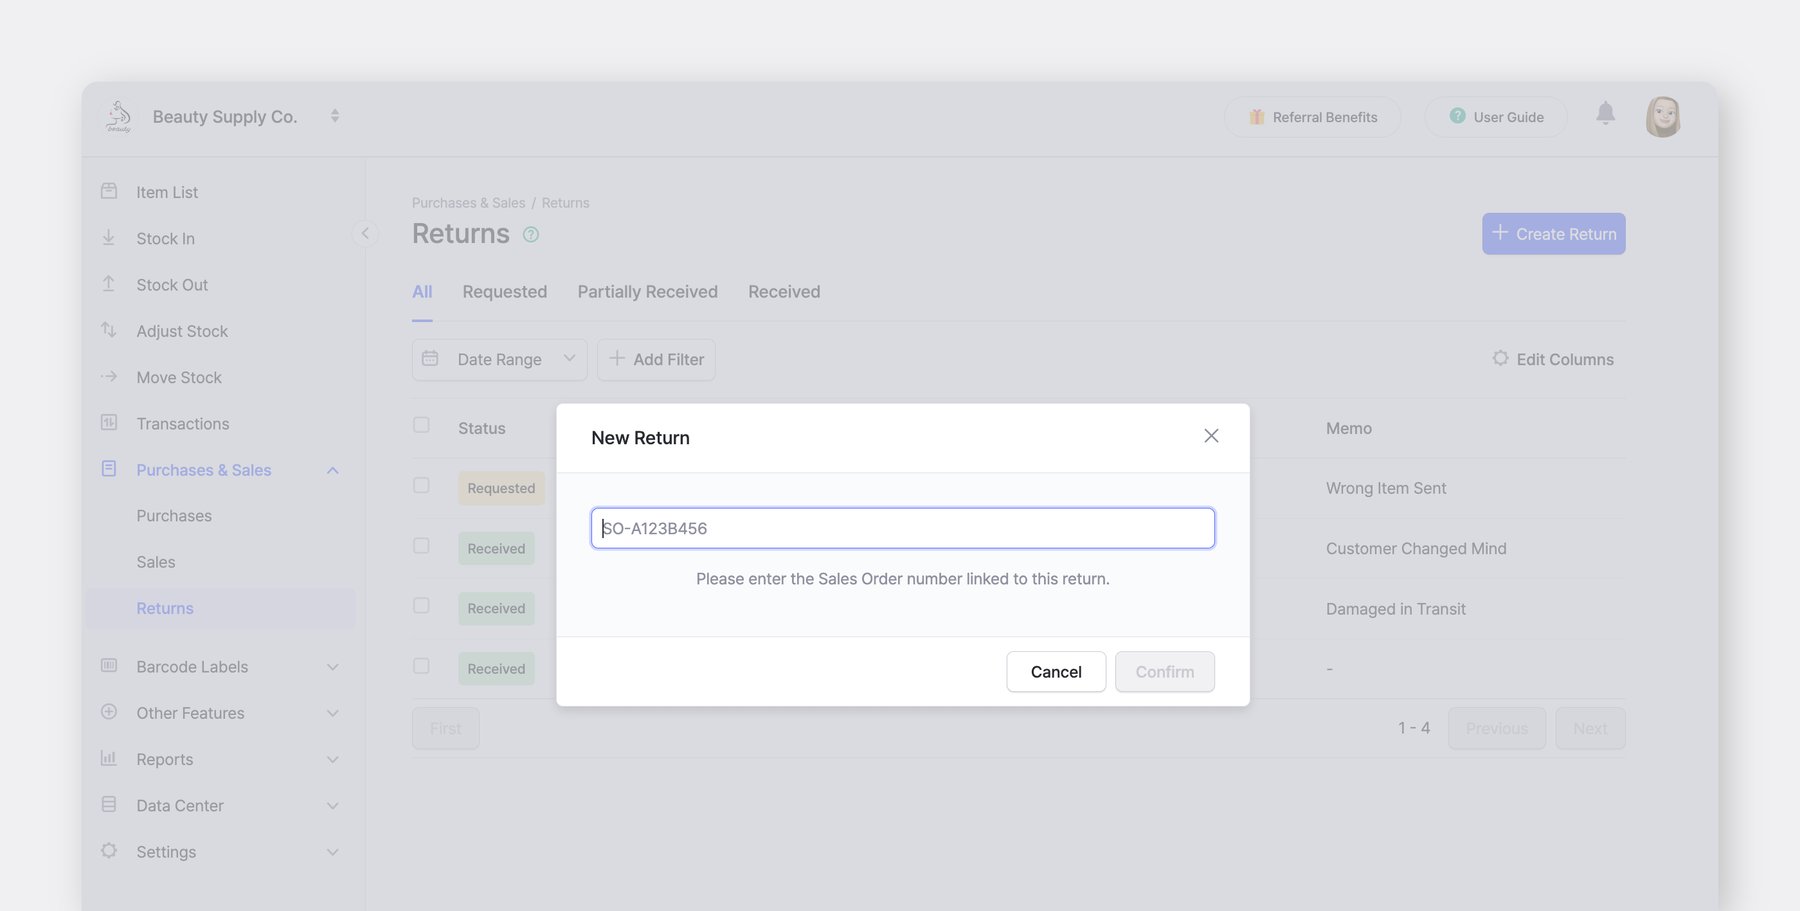
1. Navigate to <mark style="color:$primary;">`Purchases & Sales`</mark> > <mark style="color:$primary;">`Returns`</mark> in the sidebar.
2. Create a new return.
3. Enter the **Sales Order Number** in the search field. The system will automatically pull up the original item details.
4. Select the items being returned and save the order.

<figure><img src="/files/8EaYmhBQvuB9Rq87ywLT" alt=""><figcaption></figcaption></figure>

#### Option 2: Create a Return from the Sales List

Use this method if you need to browse for the original transaction first.

1. Go to <mark style="color:$primary;">`Purchases & Sales`</mark> > <mark style="color:$primary;">`Sales`</mark> and locate the specific order the customer wants to return.
2. Click on the order to open the **Details** view.
3. Click the <mark style="color:$primary;">`+ Create Return`</mark> button under the **Returned Items** section.

<figure><img src="/files/2O7QMpBFMRuKw4NYLYLl" alt=""><figcaption></figcaption></figure>

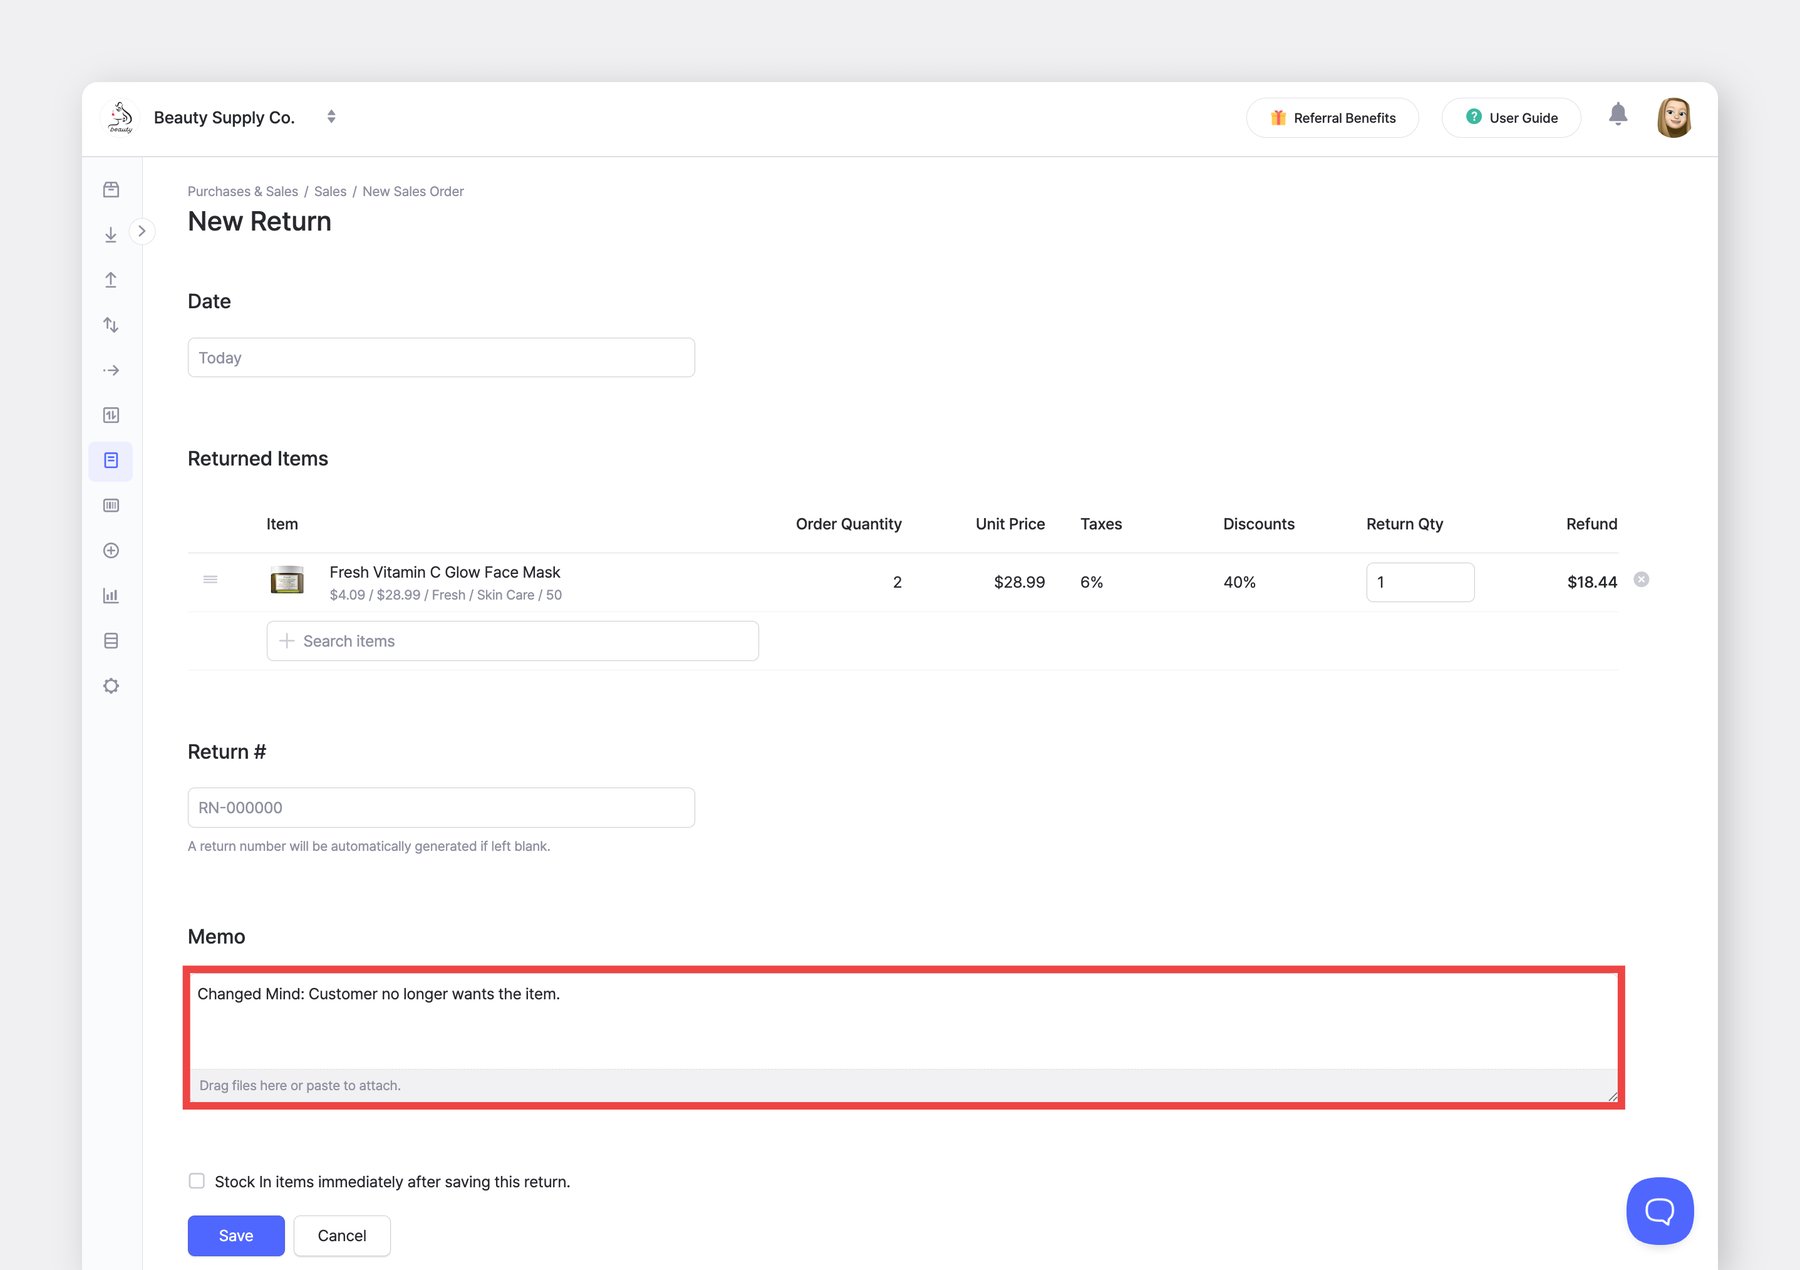
*(Optional)* Enter the return details in the memo field for better tracking and communication with your team.

<figure><img src="/files/gLxooZilmAaCCrnqJ0c2" alt=""><figcaption></figcaption></figure>

***

## Order Settings

#### Sharing and Printing Orders

You can send your orders **via email**, **print** **them**, or **save them as PDFs**. Click the <mark style="color:$primary;">`...`</mark> menu in the top right corner and select your option.

<figure><img src="/files/qW3hN7iU8Pj7vgra2vN0" alt=""><figcaption></figcaption></figure>

#### Managing Order Information

* Add or edit supplier and customer information in <mark style="color:$primary;">`Data Center`</mark> > <mark style="color:$primary;">`Partners`</mark>.
* Update your company information in <mark style="color:$primary;">`Settings`</mark> > <mark style="color:$primary;">`Team`</mark>.

<figure><img src="/files/gEvovCdHh1202SU5fL5I" alt=""><figcaption></figcaption></figure>

### A. Print Layout

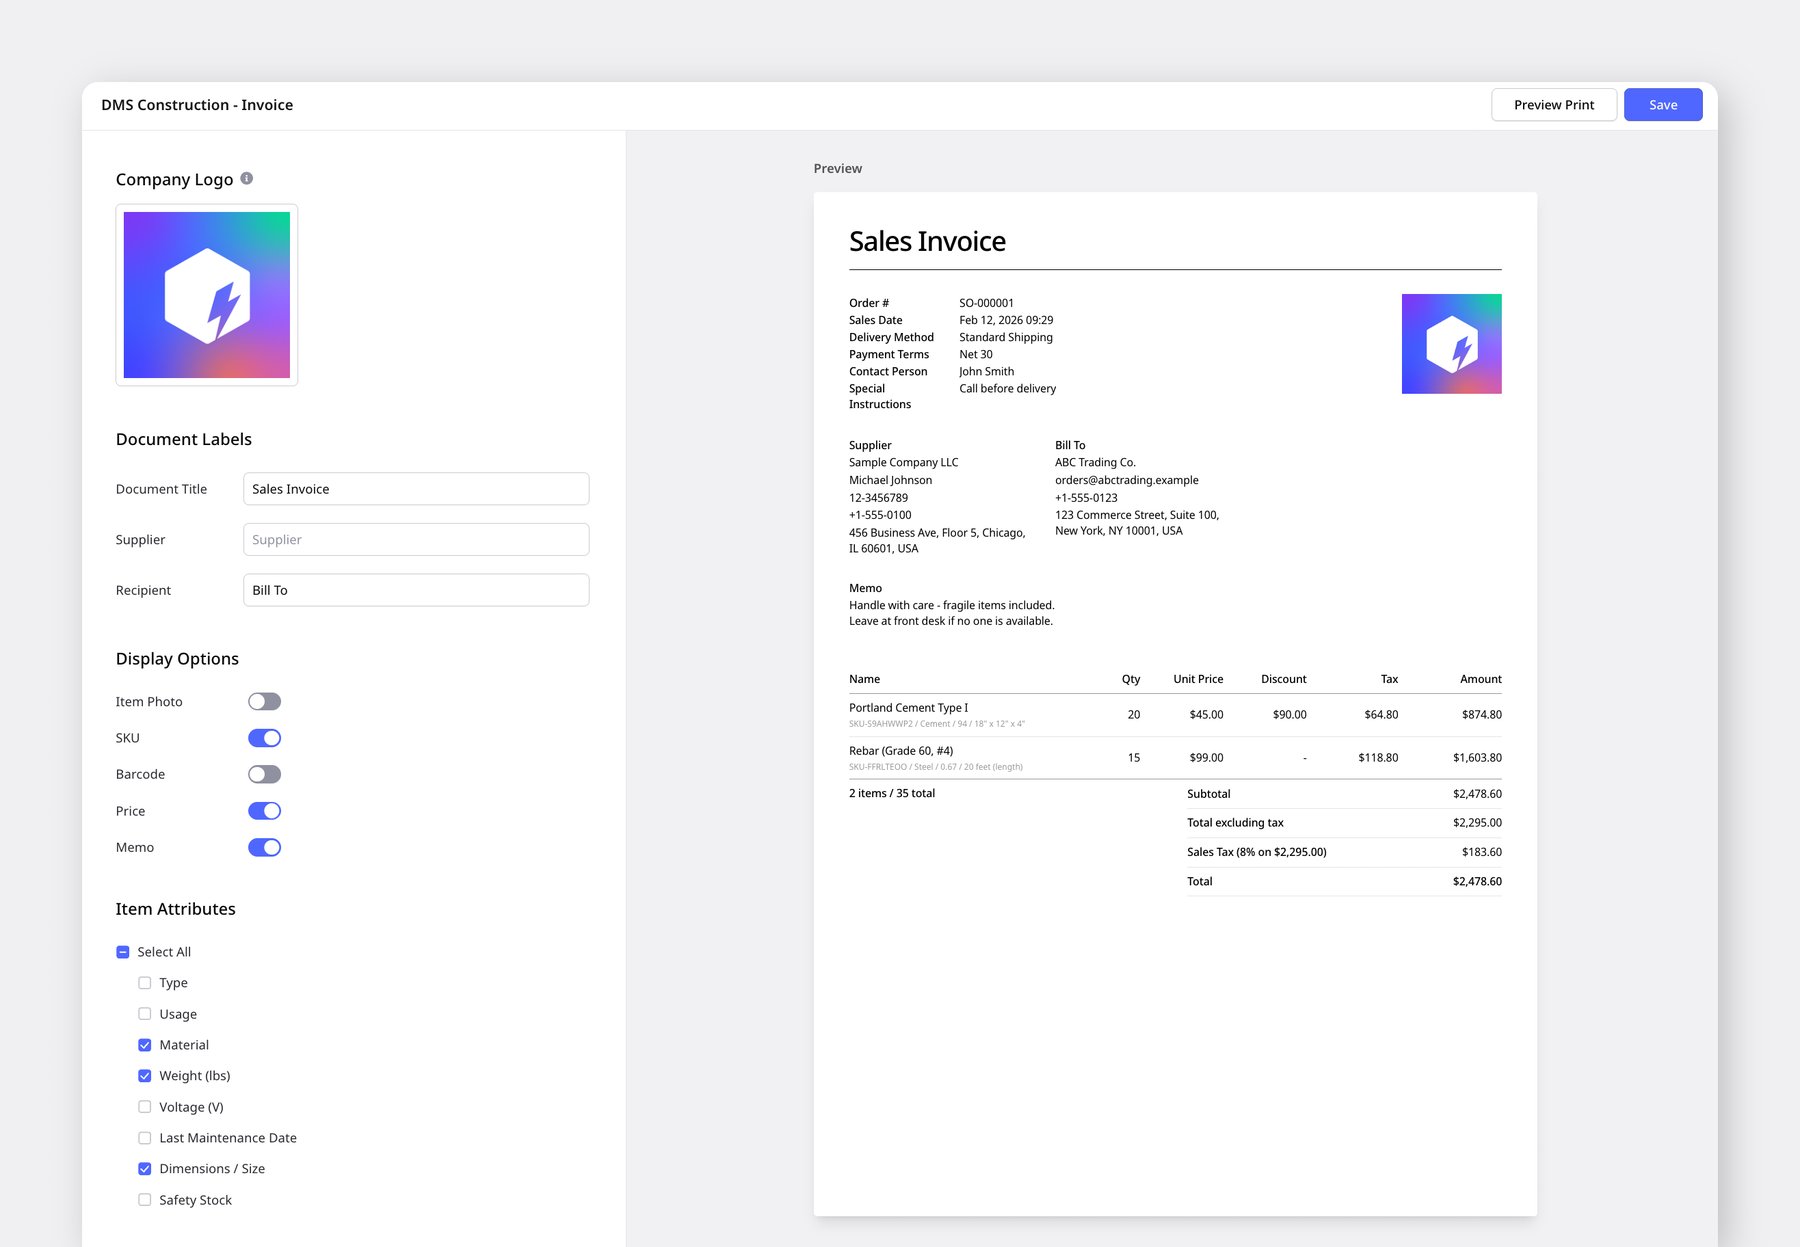
Customize what information appears on your purchase orders and sales invoices. You can set different layout templates for each document type.

Go to: <mark style="color:$primary;">`Settings`</mark> > <mark style="color:$primary;">`Orders`</mark> > <mark style="color:$primary;">`Print Layout`</mark>&#x20;

<figure><img src="/files/EVF0yO4lhXdJKTPYsVrs" alt=""><figcaption></figcaption></figure>

#### **Layout Settings**

* **Company Logo —** Add your brand image to the top right of the document.
* **Document Labels —** Change the terms shown on the document.
  * Document Title *(Purchase Order, Invoice, Packing Slip, Delivery Note)*
  * Supplier *(Vendor, Seller, From)*
  * Recipient *(Customer, Bill To, Ship To, Buyer)*
* **Display Options —** Choose which fields to include on the document.
  * Available options: *Order number barcode, Item photo, SKU, Barcode, Pricing, Memo, Expected Date (Stock In/Stock Out)*
* **Item Attributes —** Select which item attributes to display in the item details section of the document.

<figure><img src="/files/hQd5y6ouYxzbkQK3e76S" alt=""><figcaption></figcaption></figure>

{% hint style="success" %}
The **order** **number** **barcode** in the top-right corner of purchase orders and invoices is designed to be scanned with the BoxHero mobile app. Tap the [**Scan**](/docs/getting-started.md#get-the-mobile-app) button on the app's home screen and scan the barcode to jump directly to that order's detail page.
{% endhint %}

### B. Custom Fields

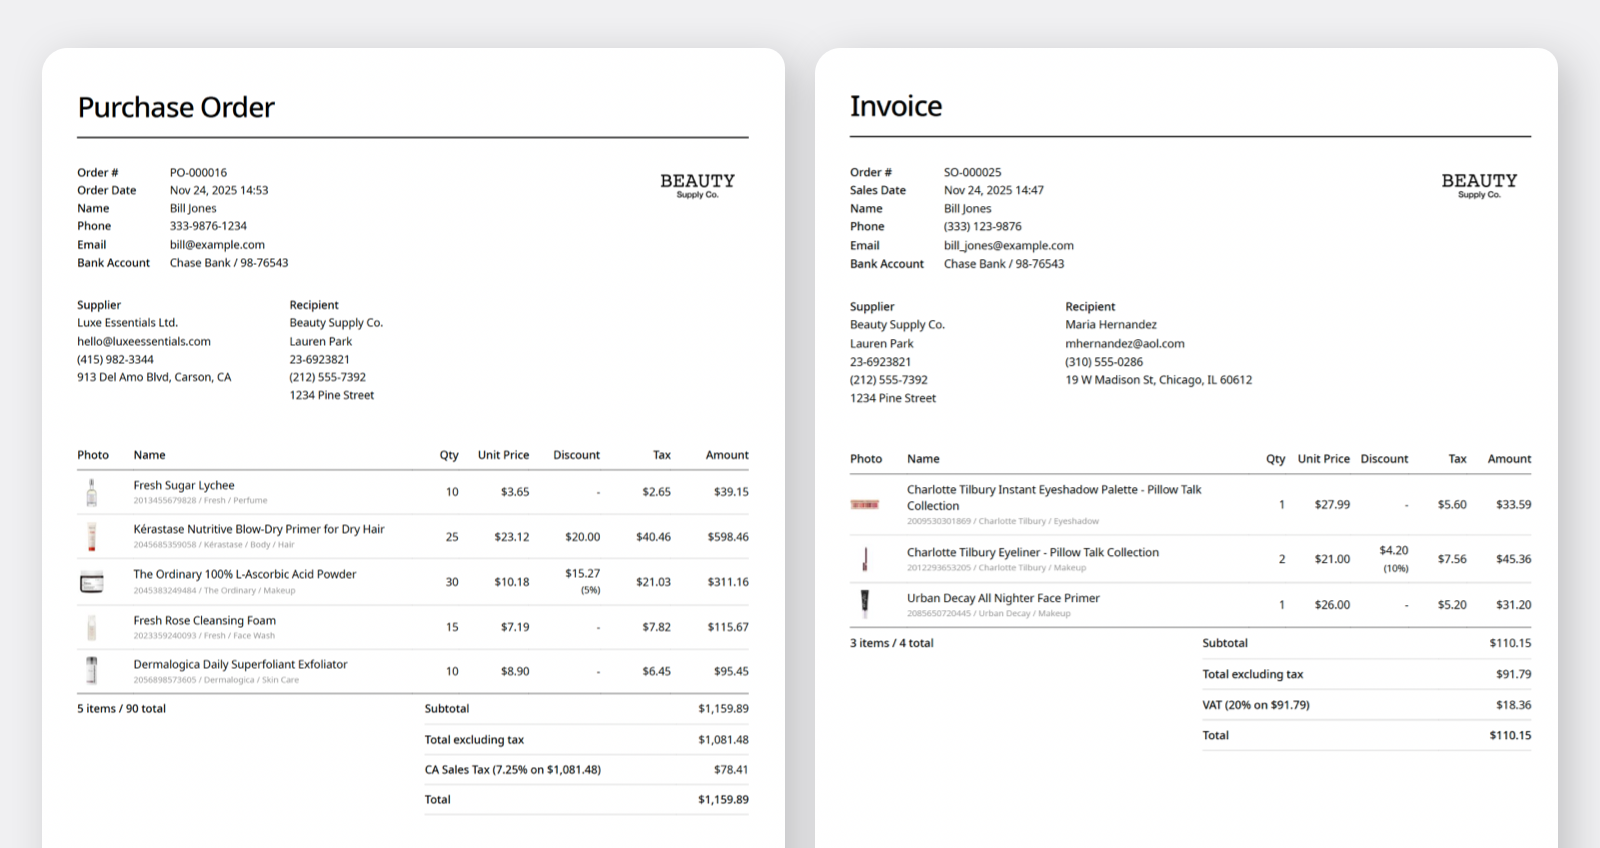
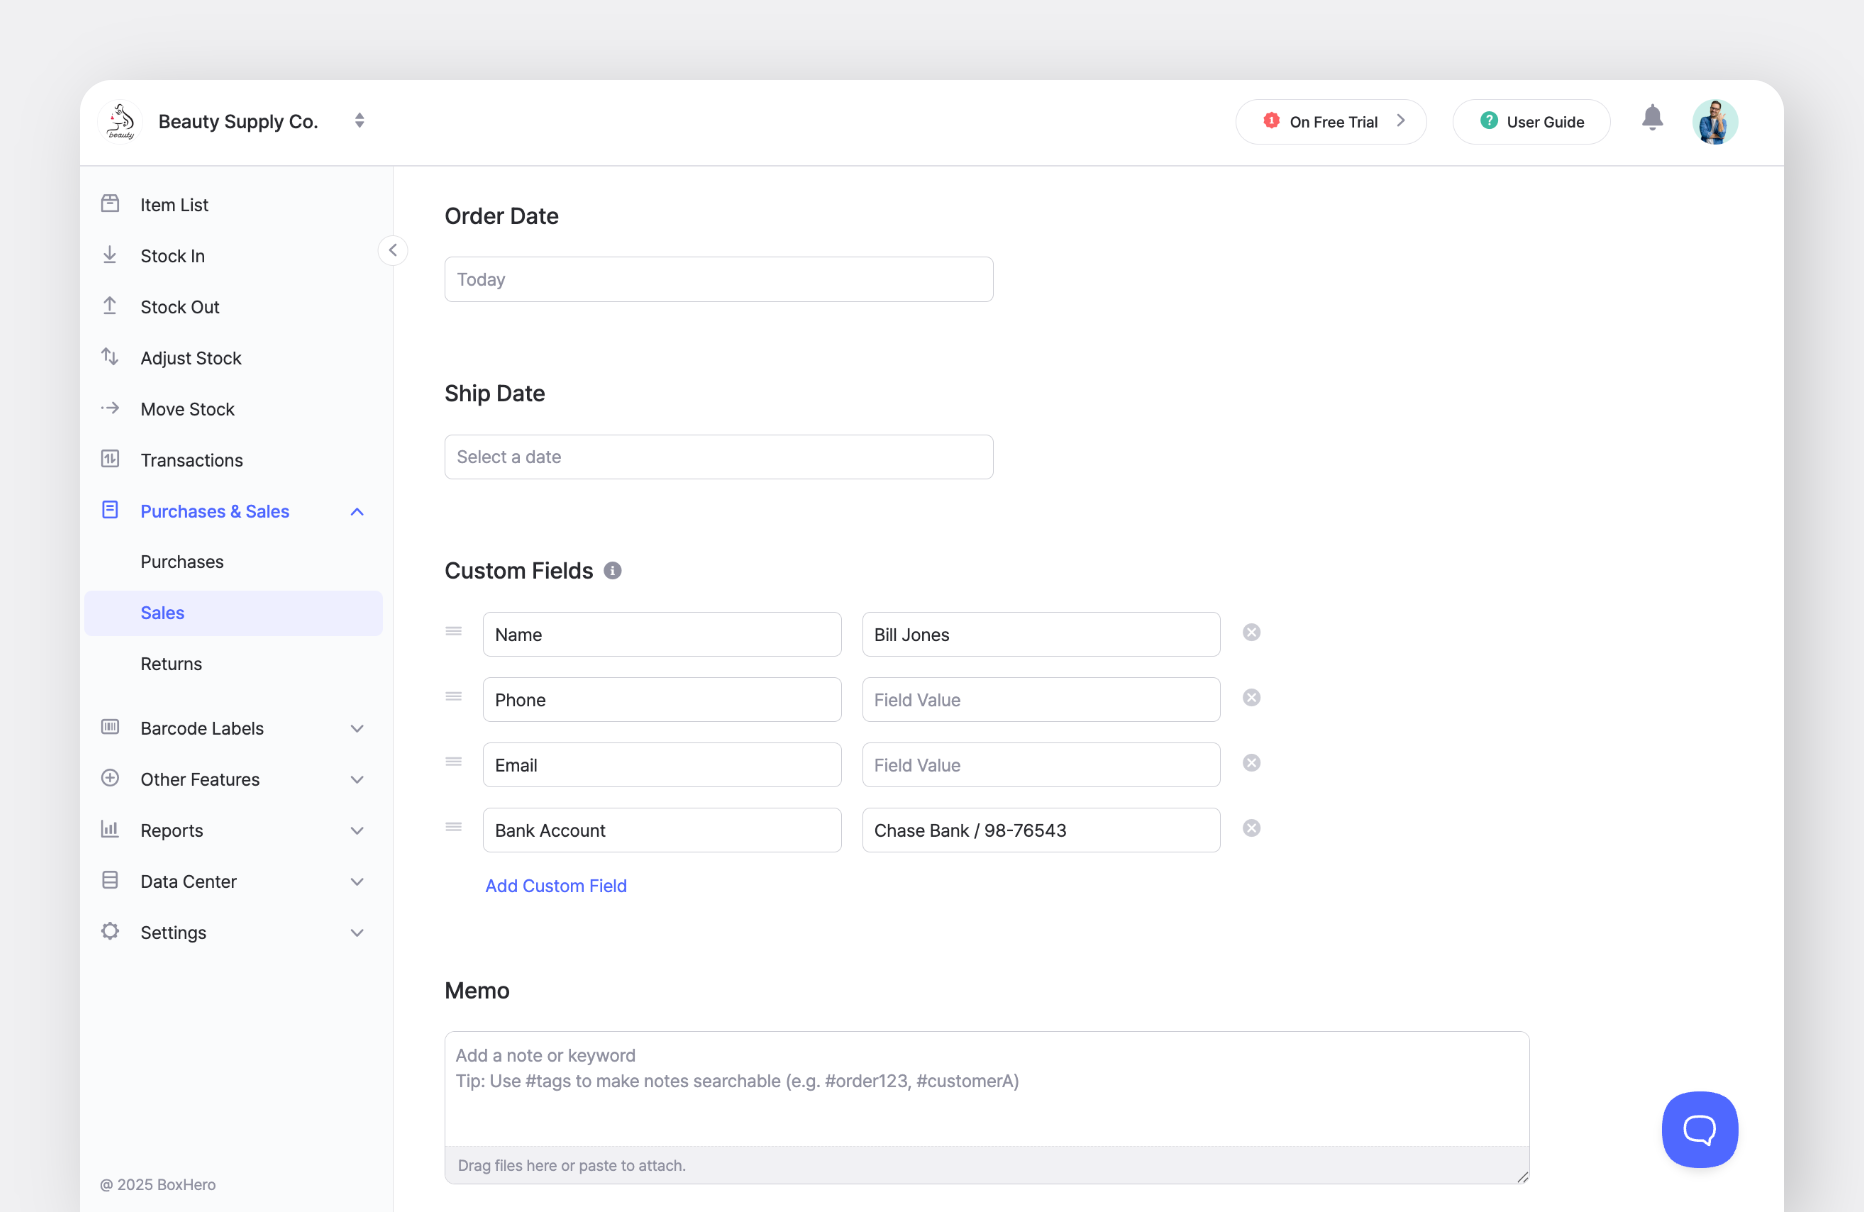
If you need additional fields such as a contact person's email address or bank account details, you can add <mark style="color:$primary;">`Custom Fields`</mark> while creating a purchase order or sales order.

<figure><img src="/files/pkAqrzIbkyke8FEtOIXR" alt=""><figcaption></figcaption></figure>

If you frequently use the same fields, save them as a **template**.

Go to: <mark style="color:$primary;">`Settings`</mark> > <mark style="color:$primary;">`Orders`</mark> > <mark style="color:$primary;">`Custom Fields`</mark> to add a new custom field, and any saved fields and their values will appear automatically whenever you create a new order.

<figure><img src="/files/TV2rl9jl8bVZogYKgiUl" alt=""><figcaption><p>In this example, <strong>Name</strong>: "<em>Bill Jones</em>" and <strong>Bank</strong> <strong>Account</strong>: "<em>Chase Bank / 98-7654</em>3" are saved as custom field values.</p></figcaption></figure>

{% hint style="warning" %}
Custom field settings apply at the **team level**, so all team members will see the same fields. Make sure to set the default values only for information that should be shared across the team.
{% endhint %}

### C. Taxes

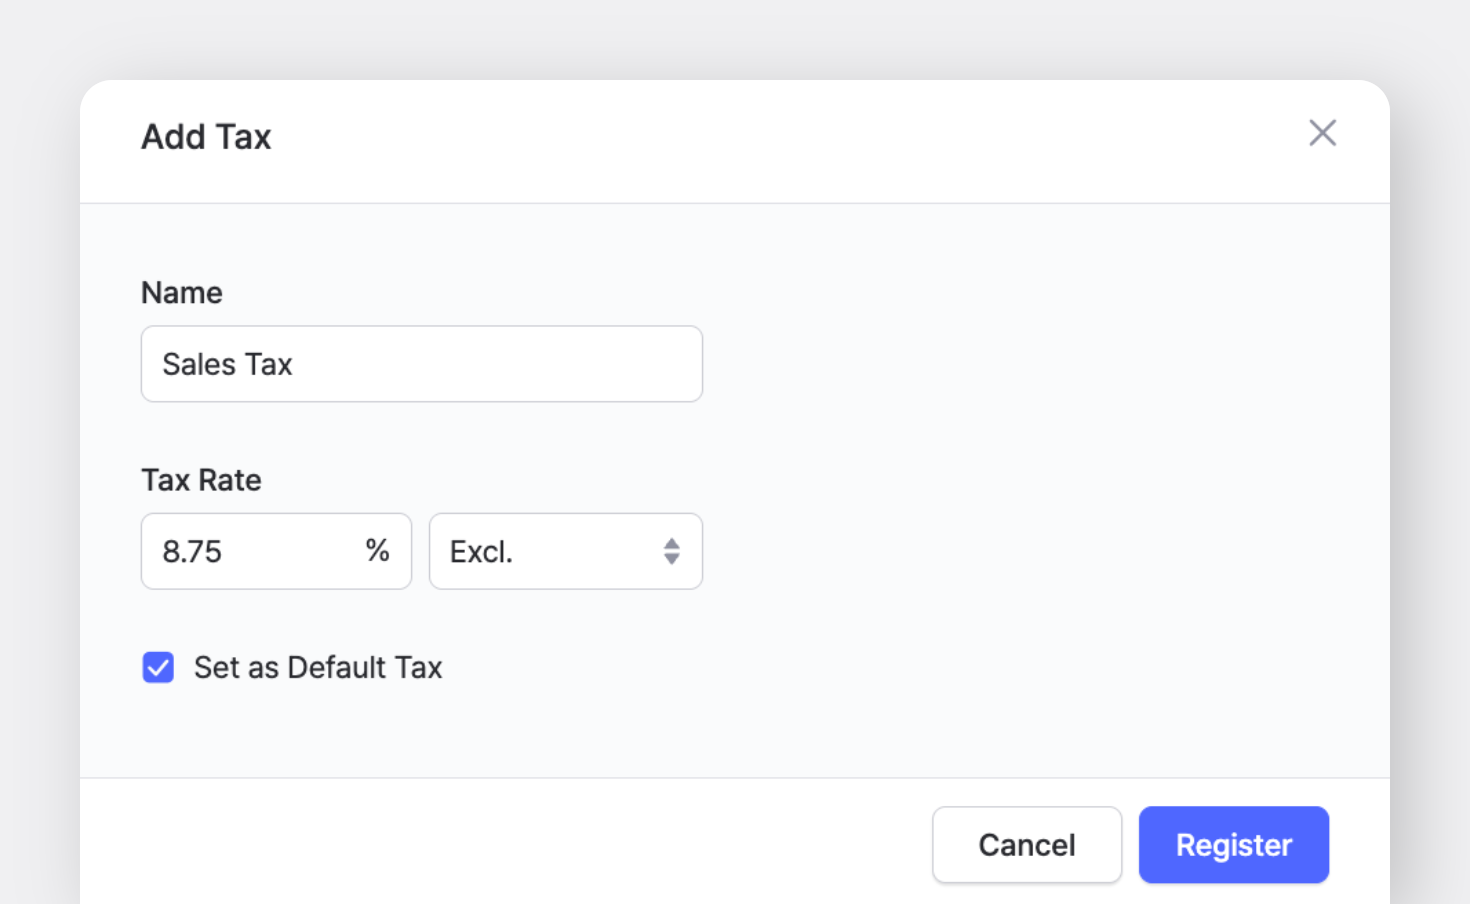
You can apply taxes to your orders and choose how they’re calculated:

* **Inclusive:** The tax is already included in the item price.
* **Exclusive:** The tax is added on top of the item price.

<figure><img src="/files/9Sej6ys72Yp5PbSWpIBU" alt=""><figcaption></figcaption></figure>

{% hint style="success" %}
If you regularly apply the same tax rate to your orders, you can set it as the **default**.
{% endhint %}

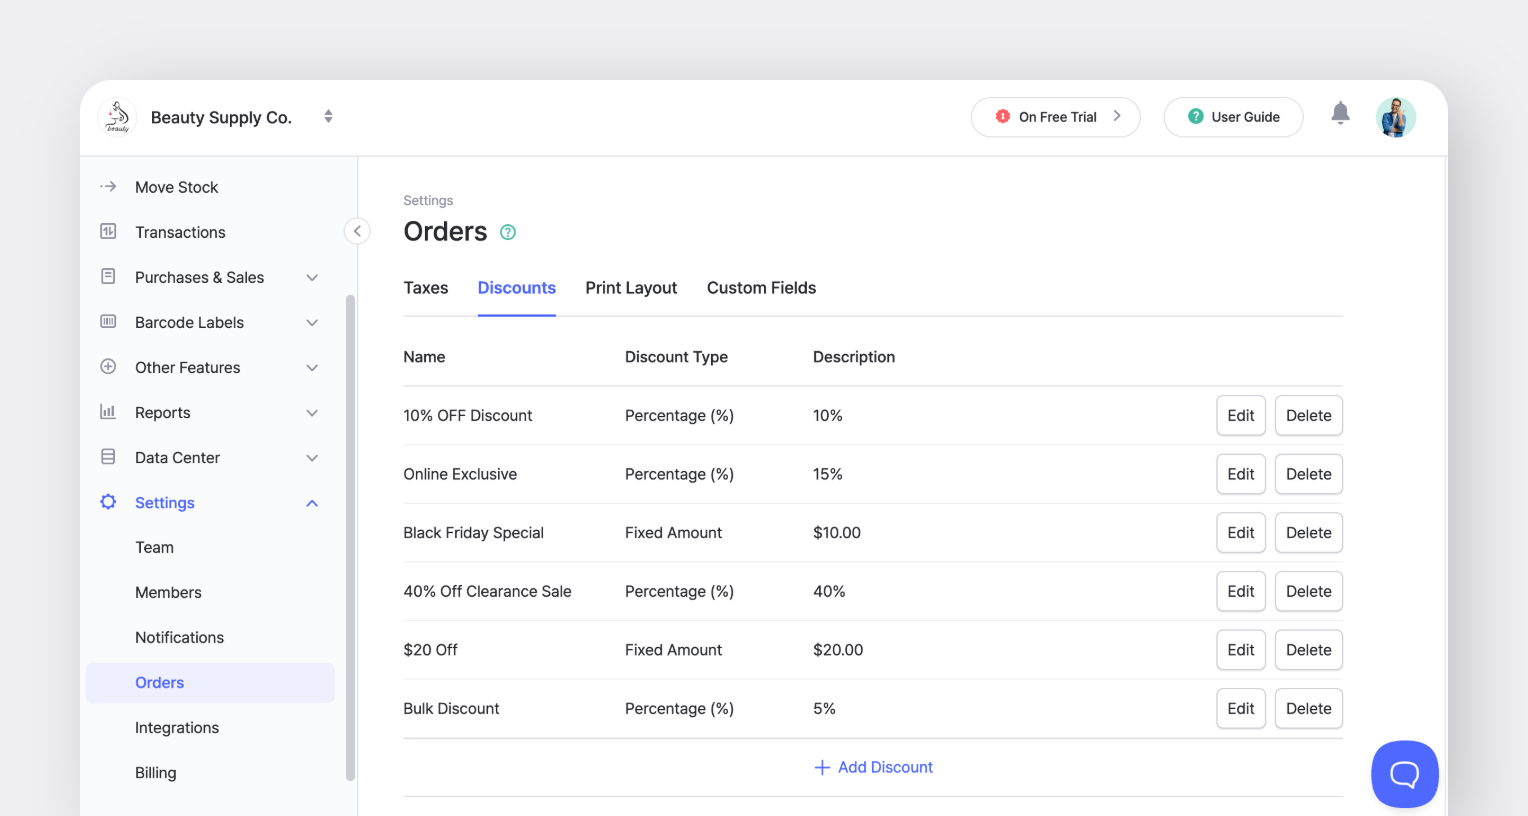
### D. Discounts

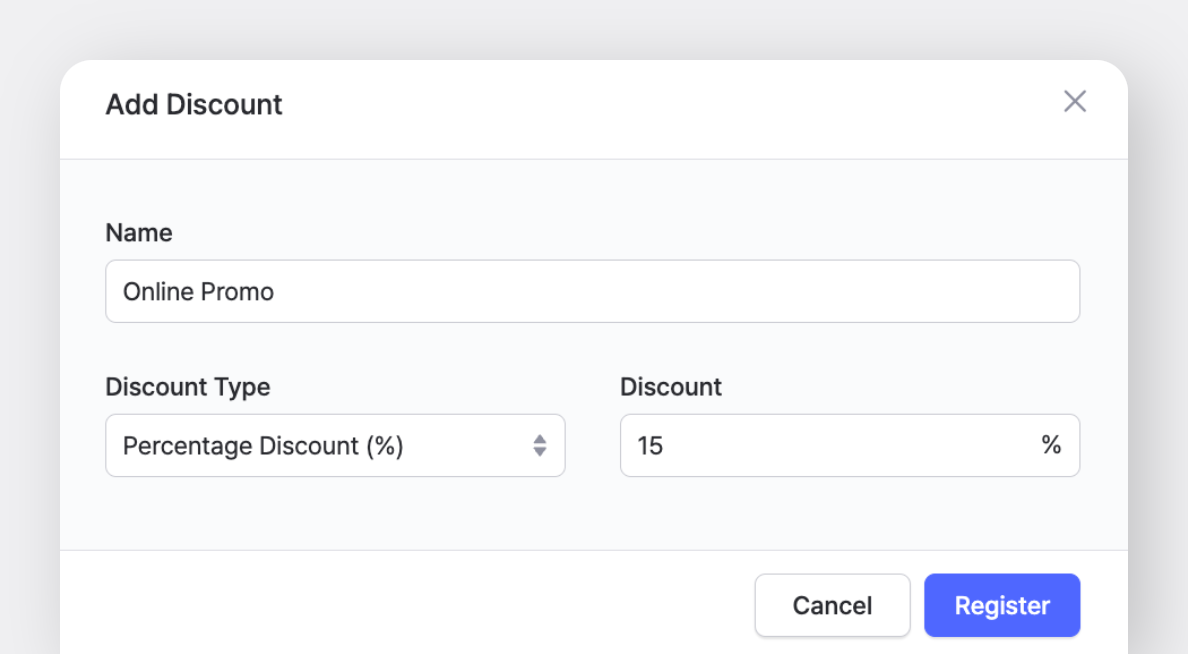
You can also apply discounts to your orders:

* **Percentage Discount** (e.g., 10% off)
* **Fixed Discount** (e.g., $5 off)

<figure><img src="/files/u8zIqafD5csKyWUV0yDC" alt=""><figcaption></figcaption></figure>

{% hint style="warning" %}
**Note**: When *both* taxes and discounts are applied, **discounts are calculated first**, followed by taxes.
{% endhint %}

***

## Price Lists

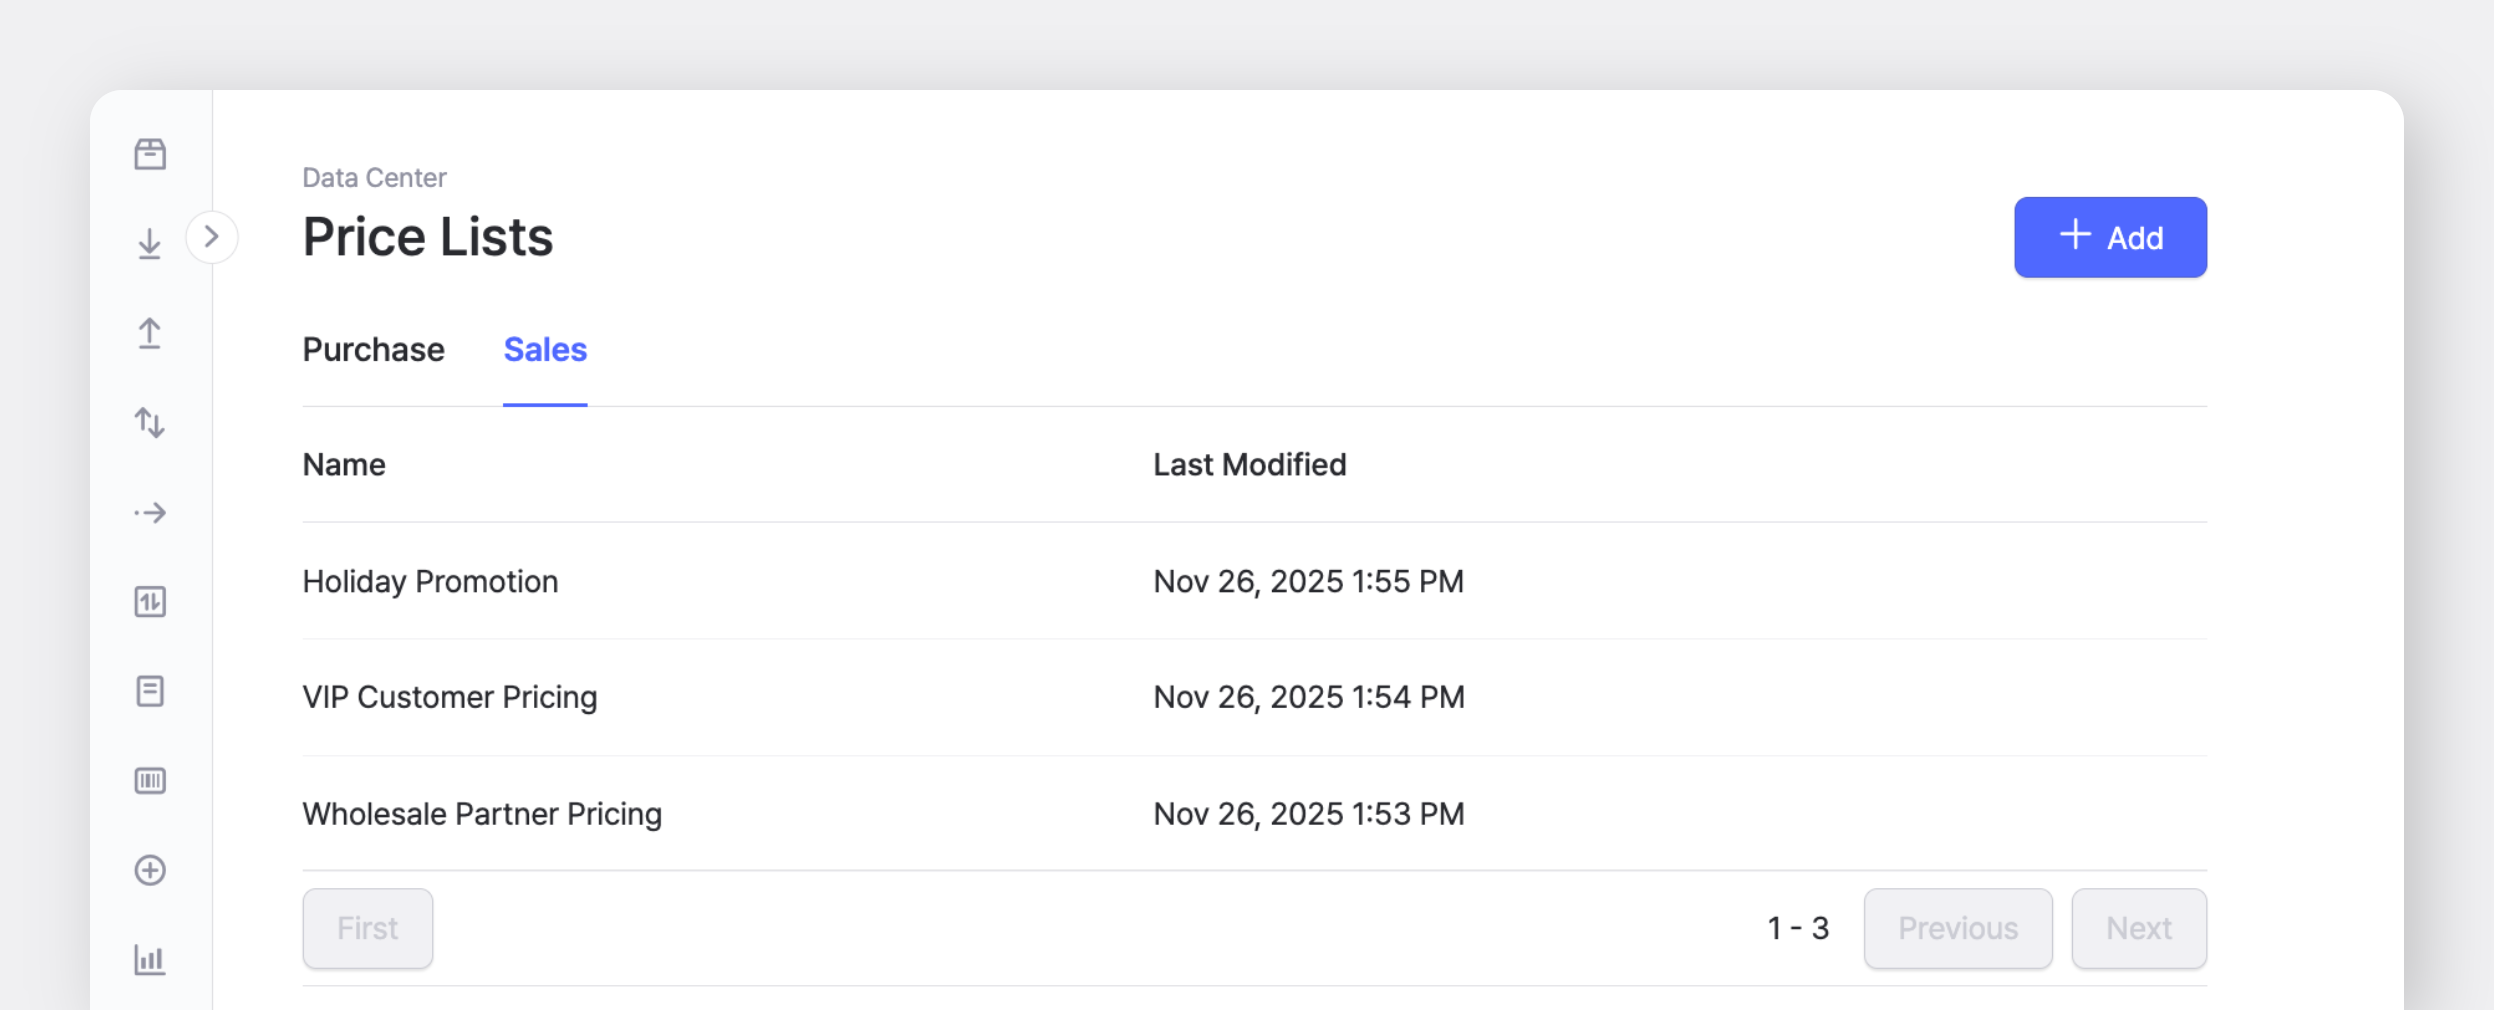
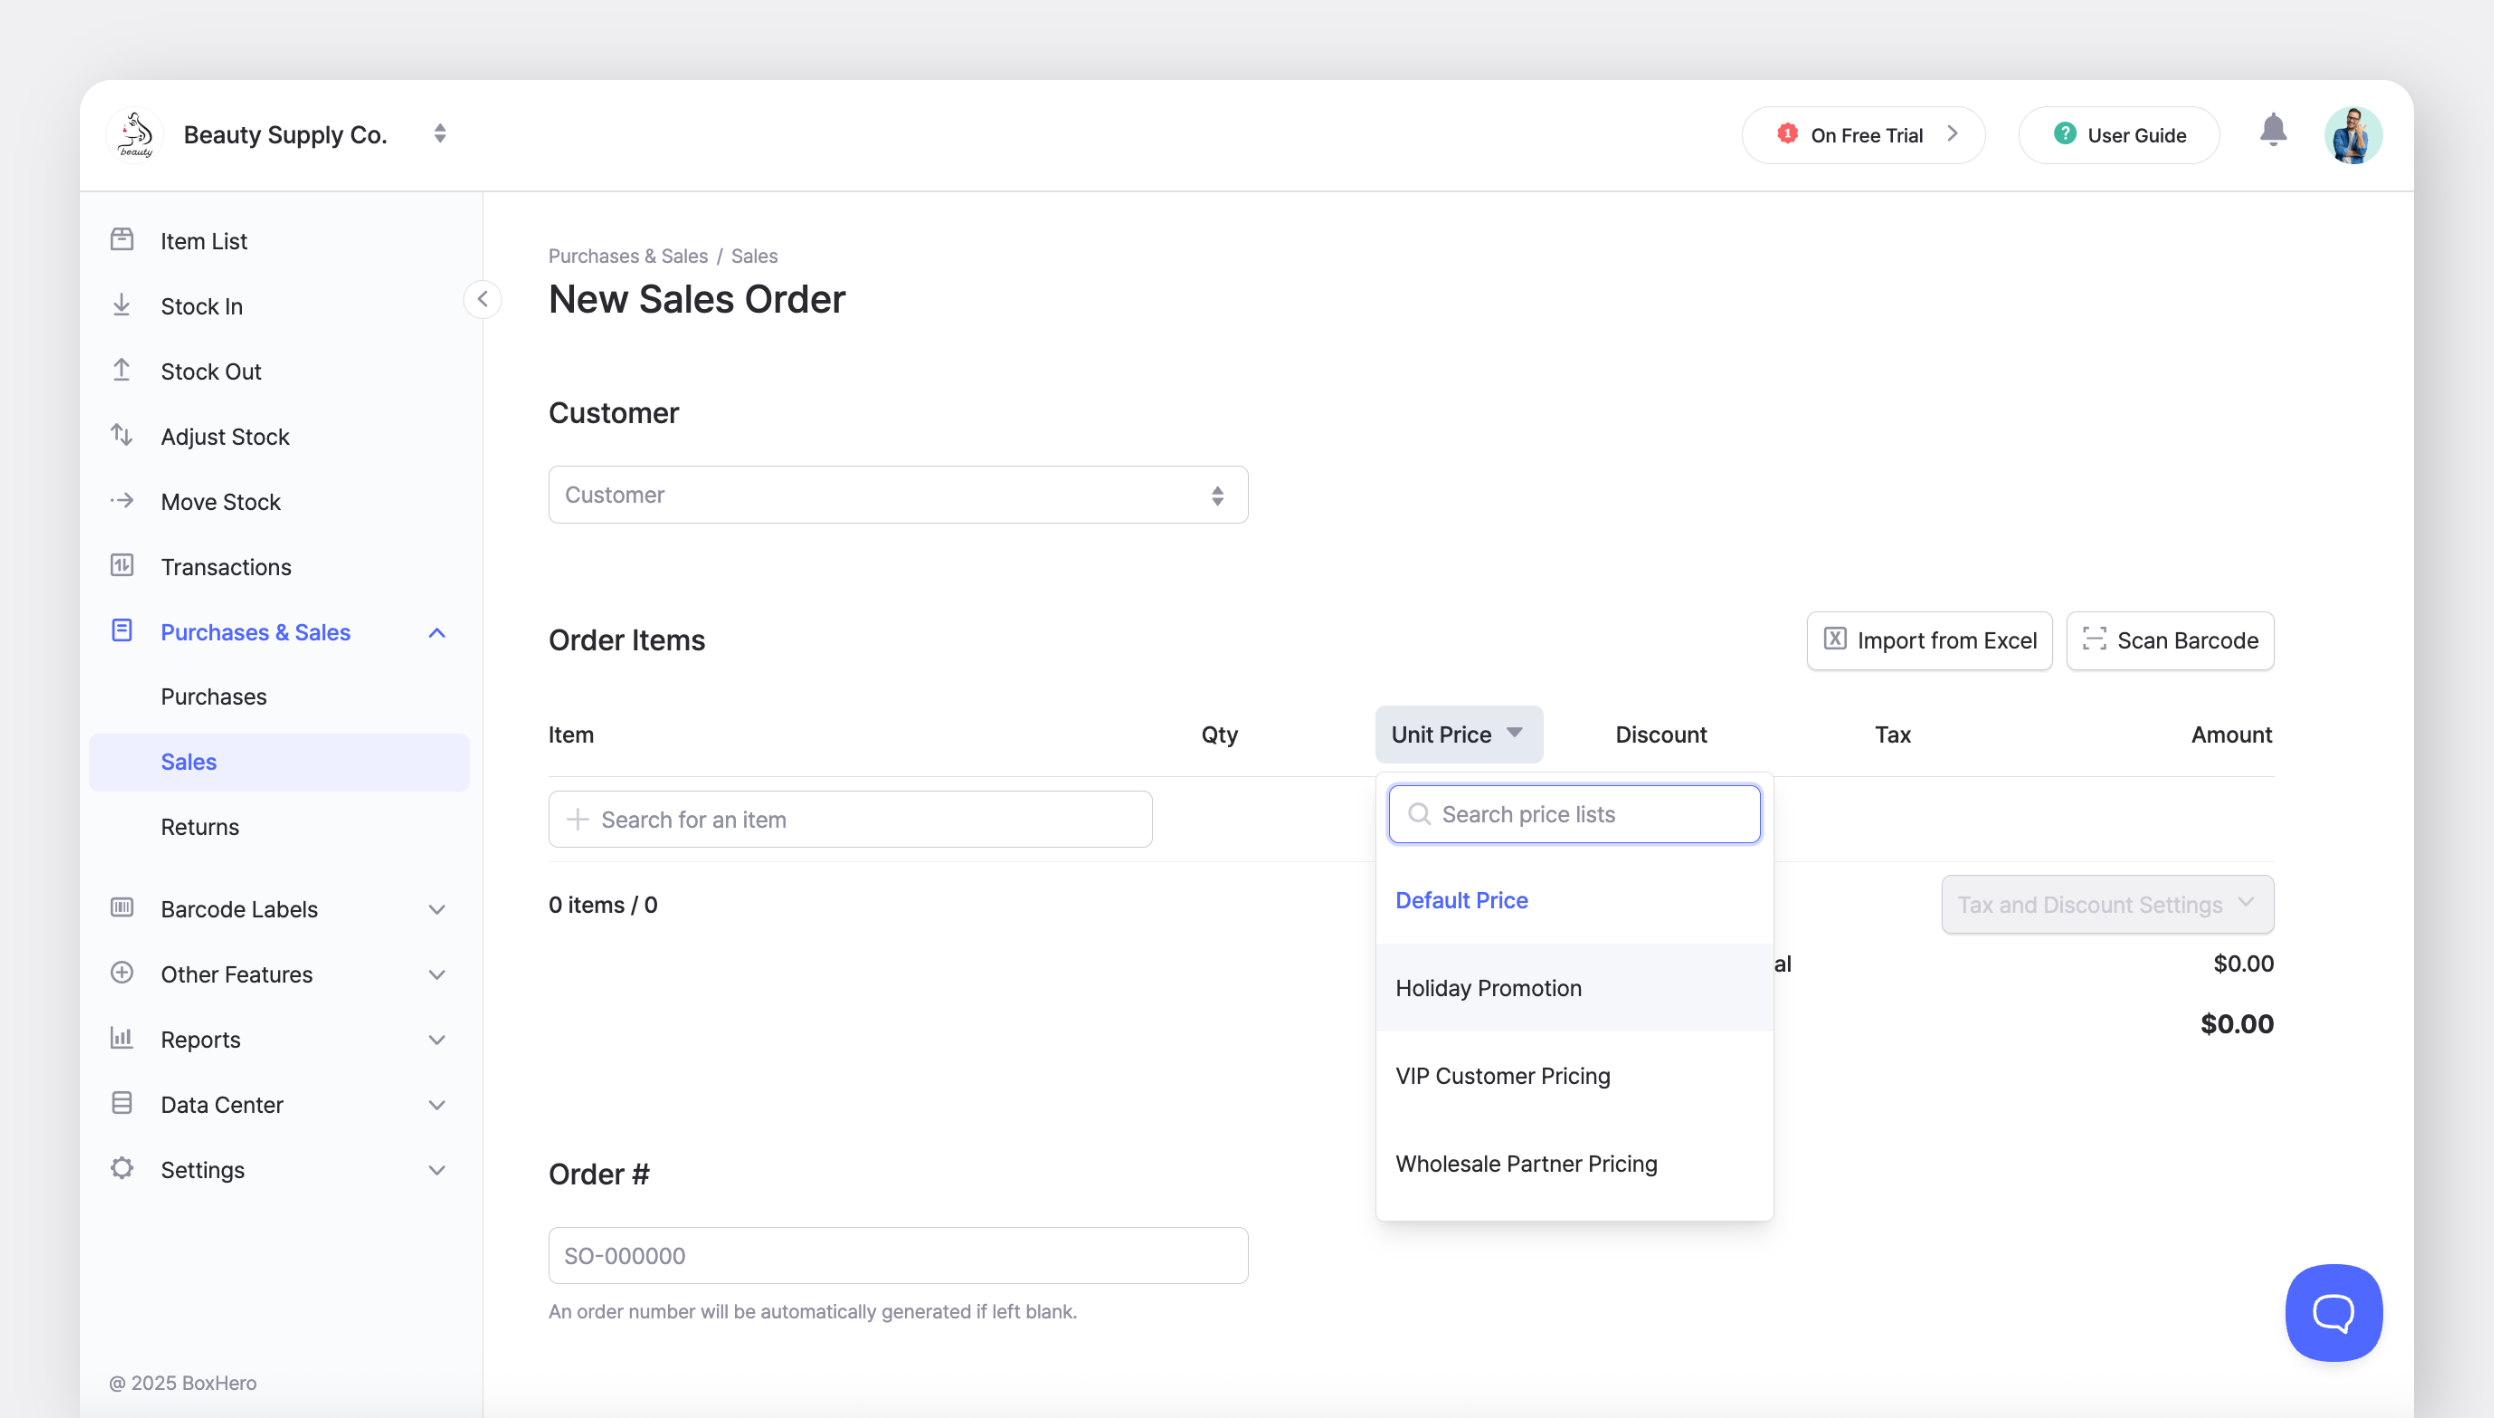
<mark style="color:$primary;">`Price Lists`</mark> let you save different prices for specific clients, promotions, or special agreements. Along with your default cost and sale price, you can create additional price sets and apply them when you create a purchase order or sales order.

<figure><img src="/files/6SvXpSrgQFayUzUKAjnc" alt=""><figcaption></figcaption></figure>

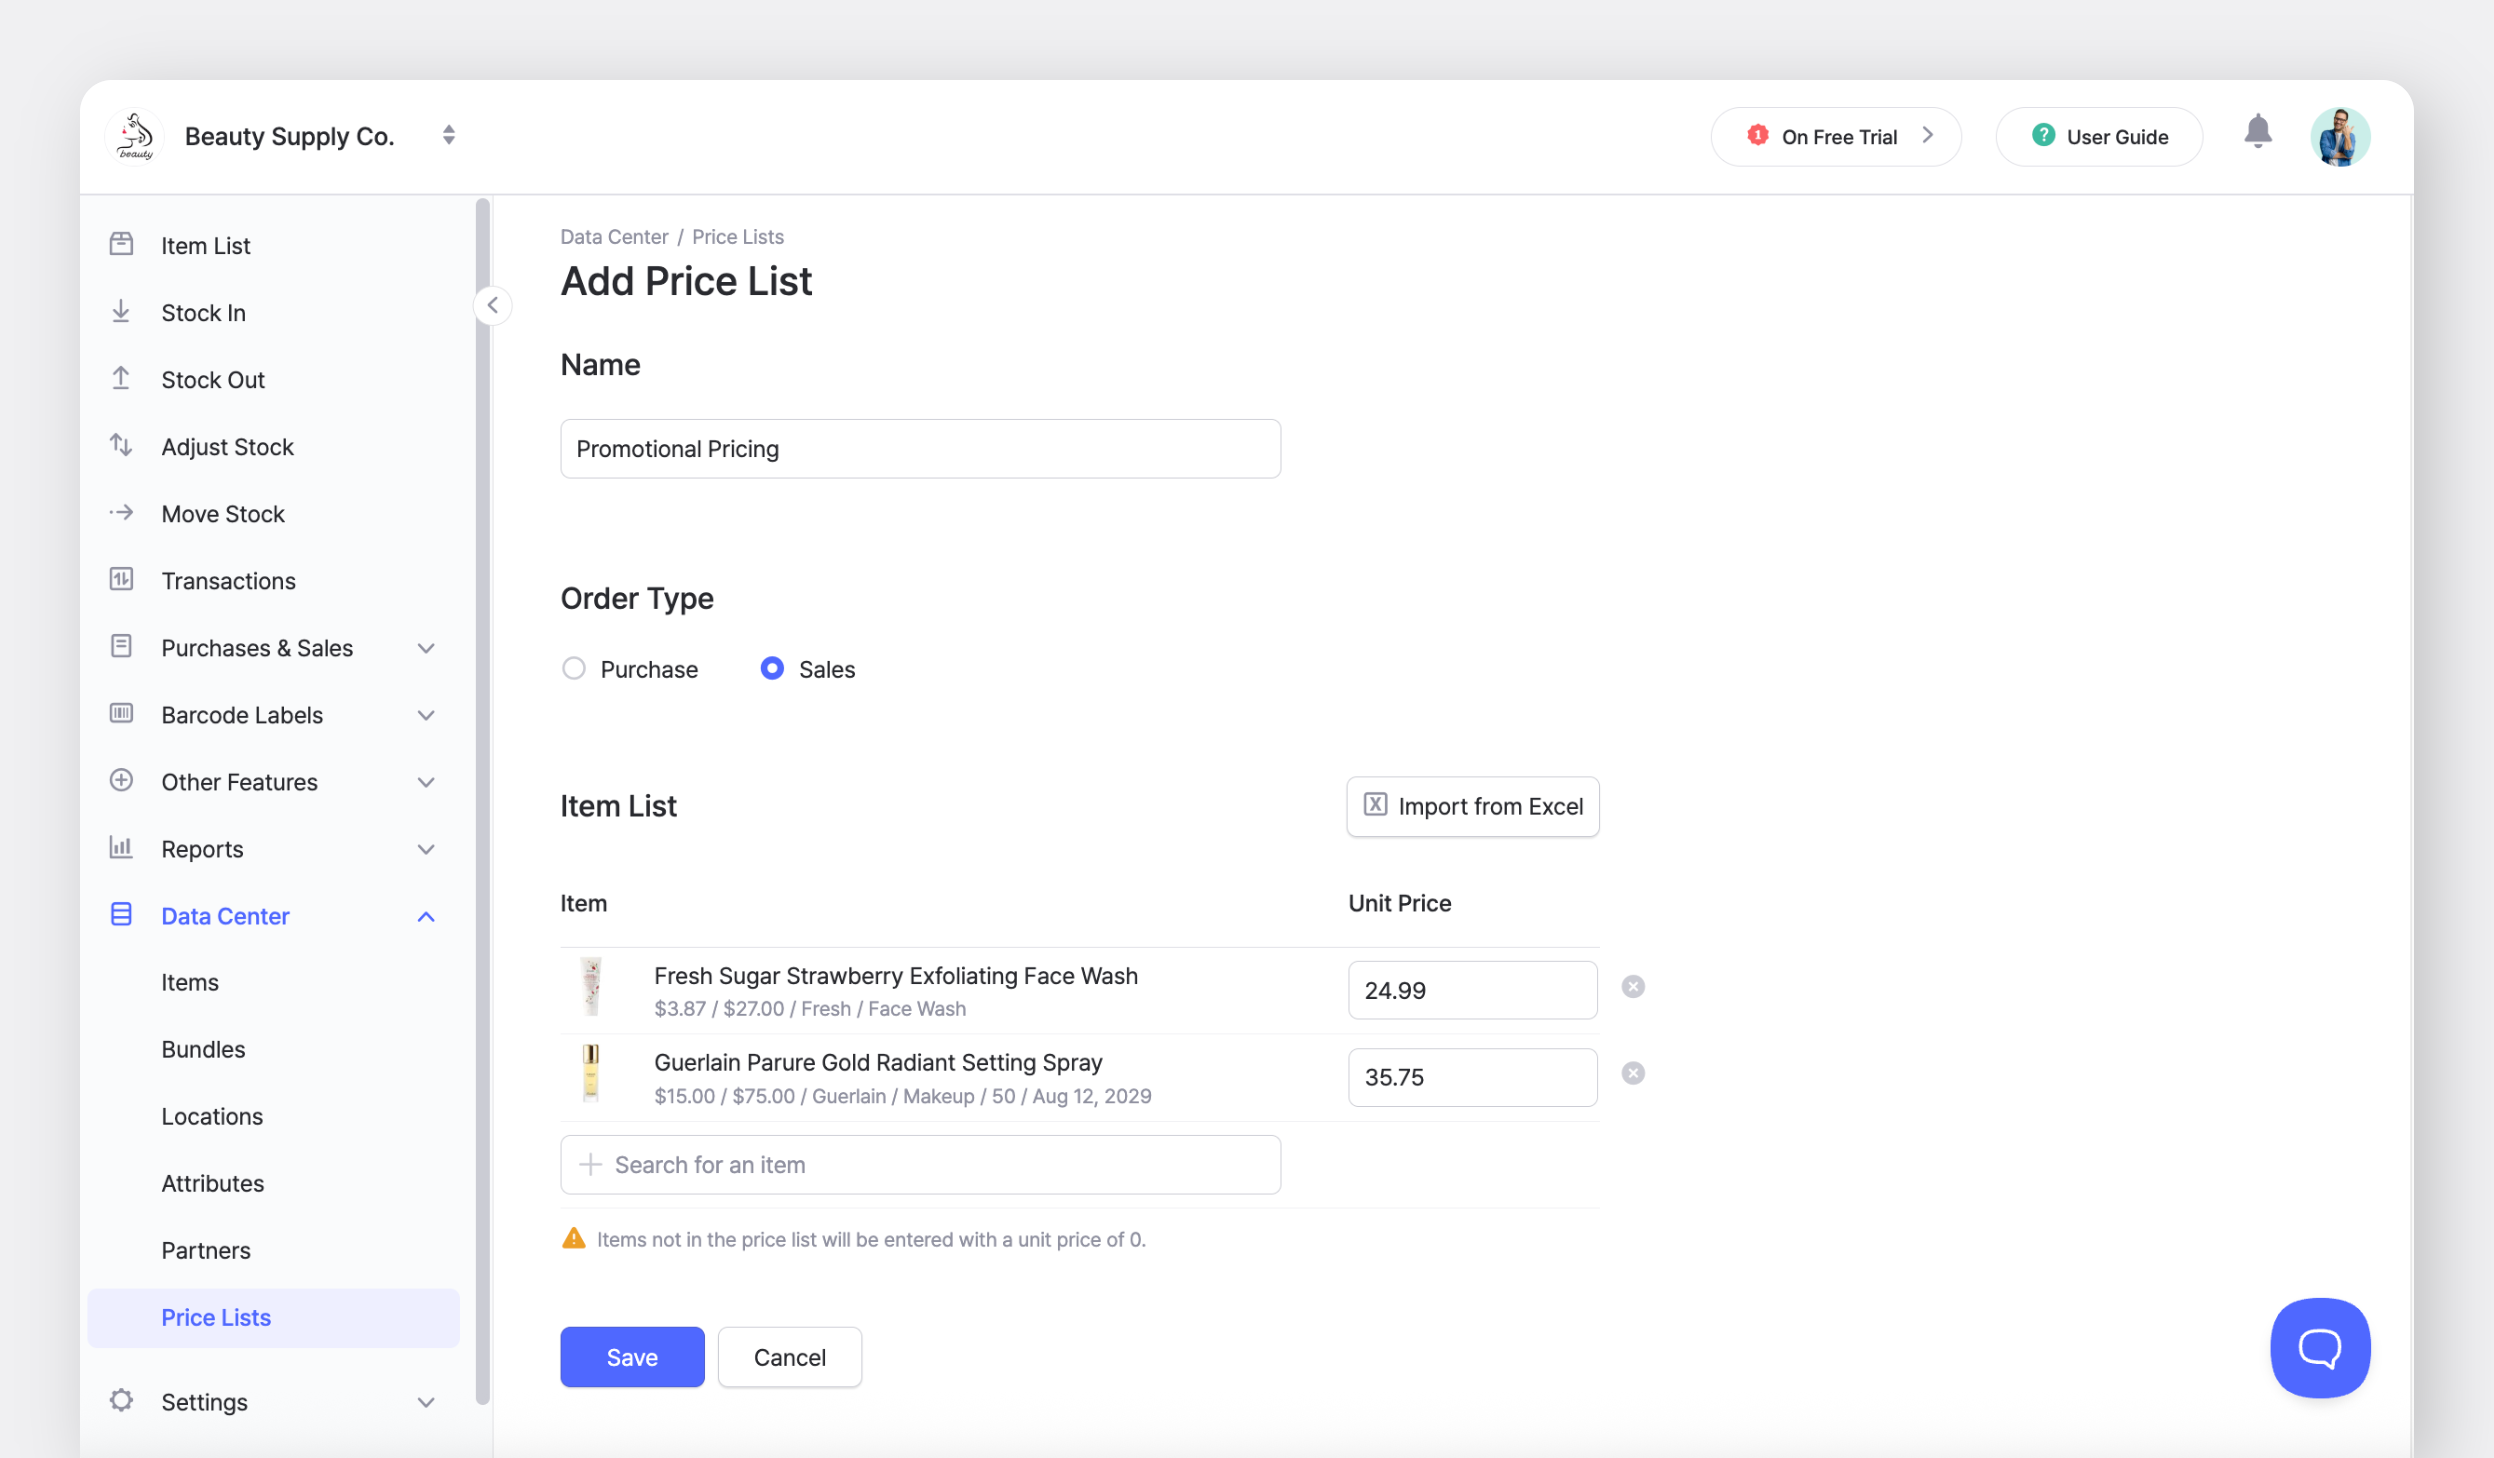
You can create a price list under <mark style="color:$primary;">`Data Center`</mark> > <mark style="color:$primary;">`Price Lists`</mark>.

Price lists can be set up separately for purchase and sales types. Add item prices manually or upload them all at once using an Excel file.

<figure><img src="/files/Jv6WbVNUV26vzqSUhNSI" alt=""><figcaption></figcaption></figure>

{% hint style="info" %}
**Note:** Items *not* included in the selected price list will show a unit price of 0 when the list is applied to a new order.
{% endhint %}

When you create an order, click on the <mark style="color:$primary;">`Unit Price`</mark> field to choose a price list. If you switch to another price list while editing, the unit prices will update based on the one you selected.

<figure><img src="/files/3C222ZeARZ7YaLwwYGXU" alt=""><figcaption></figcaption></figure>

{% hint style="success" %}
If you want to see an item’s default cost or sale price while creating an order, you can adjust your display settings. Go to <mark style="color:$primary;">`Settings`</mark> > <mark style="color:$primary;">`Team`</mark>, and under <mark style="color:$primary;">`Display Settings`</mark>, choose **Cost, Price, All Attributes**. This shows the item’s registered prices along with all of its attributes.
{% endhint %}

***

## Currency

You can set a separate currency for each Purchase Order and Sales Order when needed — independent of your team settings.

* When you set a [default currency](/docs/settings/team.md#currency) for your team, it's auto-selected on every new order.
* You can switch to a different currency directly from the order screen.

<figure><img src="/files/MkB91lqi0W6FR1Pkdfzx" alt=""><figcaption></figcaption></figure>

#### Exchange Rates

Each order is converted from the currency it was created in into your display currency using the latest exchange rate in the [Sales Report](/docs/key-features/purchase-and-sales/sales-reports.md).

The rate applied appears in the **Exchange Rates** indicator at the top of the report, labeled with the date and time it was retrieved (for example, "As of Jun 1, 2026 1:00 PM").

<figure><img src="/files/Gl0nN8fvp4kND347kT4k" alt=""><figcaption></figcaption></figure>

***

## Feature Highlights

Explore additional features in <mark style="color:$primary;">`Purchases & Sales`</mark> to get the most out of your orders.

<table data-card-size="large" data-view="cards"><thead><tr><th></th><th></th><th data-hidden data-card-cover data-type="image">Cover image</th><th data-hidden data-card-target data-type="content-ref"></th></tr></thead><tbody><tr><td><h4><strong>Bundles</strong></h4></td><td>Group multiple items into a single unit for streamlined purchase and sales orders.</td><td><a href="/files/NWFET5jXX2cN3c8Wjz0e">/files/NWFET5jXX2cN3c8Wjz0e</a></td><td><a href="/pages/6JsJpZX9vg5CF2Tm511u">/pages/6JsJpZX9vg5CF2Tm511u</a></td></tr><tr><td><h4><strong>Sales Reports</strong></h4></td><td>Track profit analysis and sales performance to gain insights into your business. </td><td><a href="/files/bYofQS7NGKh1RgMeEGKF">/files/bYofQS7NGKh1RgMeEGKF</a></td><td><a href="/pages/yCrxXeMkNjqcF3ZZs9YU">/pages/yCrxXeMkNjqcF3ZZs9YU</a></td></tr></tbody></table>

***

## Frequently Asked Questions

**Have** **questions on Purchases & Sales**? Check out our FAQ:

{% content-ref url="/spaces/mkYNU2xLl20GSI6NQQ6q/pages/n2XLfpEEoLCaOIwPQ5Zh" %}
[Orders](/docs/faq/inventory-and-transactions/orders.md)
{% endcontent-ref %}